- Materials
-
- 1 µg (or 100-200 fmol) high molecular weight genomic DNA
- Ligation Adapter (LA)
- Ligation Buffer (LNB)
- Long Fragment Buffer (LFB)
- Short Fragment Buffer (SFB)
- Elution Buffer from the Oxford Nanopore kit (EB)
- Consumables
-
- NEBNext® Companion Module for Oxford Nanopore Technologies® Ligation Sequencing (cat # E7180S or E7180L).
Alternatively, you can use the NEBNext® products below:
- NEBNext FFPE DNA Repair Mix (NEB, M6630)
- NEBNext® Ultra II End Repair / dA-tailing Module (NEB, E7546)
- NEBNext Quick Ligation Module (NEB, E6056)
- Agencourt AMPure XP Beads (Beckman Coulter™, A63881)
- Nuclease-free water (e.g. ThermoFisher, cat # AM9937)
- Freshly prepared 80% ethanol in nuclease-free water
- Hard-Shell® 96-Well PCR Plates, low profile, thin wall, skirted, red/clear (Bio-Rad™, cat # HSP9611)
- Thermo Scientific™ Abgene™ 96 Well 1.2 ml Polypropylene Deepwell Storage Plate (Thermo Scientific, cat # AB1127)
- 5 ml Eppendorf DNA LoBind tubes
- 2 ml Eppendorf DNA LoBind tubes
- 1.5 ml Eppendorf DNA LoBind tubes
- 1000 µl Disposable Conductive Tips - Liquid Handling Flexible Channel Arm - Filtered, Pure, ANSI/SLAS-format box (same as SBS) (Tecan , cat# 30057817)
- 200 ul Disposable Conductive Tips - Liquid Handling Flexible Channel Arm - Filtered, Pure, ANSI/SLAS-format box (same as SBS) (Tecan , cat# 30057815)
- 50 ul Disposable Conductive Tips - Liquid Handling Flexible Channel Arm - Filtered, Pure, ANSI/SLAS-format box (same as SBS) (Tecan , cat# 30057813)
- Small SBS Box to place conductive tips & refill, compatible with 10uL, 50uL, 200uL tips (Tecan , cat# 30058506)
- Big SBS Box to place conductive tips & refill, compatible with 1000uL tips (Tecan , cat# 30058507)
- 150 µl Disposable Tips - MultiChannel Arm™ 384/96 - Filtered, Sterile, Single Stack (Tecan, cat # 30038618)
- 50 µl Disposable Tips - MultiChannel Arm 384/96 - Filtered, Sterile, Single Stack (Tecan, cat # 30038608)
- 100 ml disposable trough (Tecan, cat # 10613049)
- 25 ml disposable trough (Tecan, cat # 30055743)
- Sarstedt Inc Screw Cap Micro tube 2 ml, sterile (Sarstedt™, cat # 72.694.321)
- Equipment
-
- Ice bucket with ice
- P1000 pipette and tips
- P200 pipette and tips
- P100 pipette and tips
- P10 pipette and tips
- Microplate centrifuge, e.g. Fisherbrand™ Mini Plate Spinner Centrifuge (Fisher Scientific, 11766427)
- Vortex mixer
- Optional equipment
-
- Qubit fluorometer plate reader (or equivalent for QC check)
-
Prepare the NEBNext FFPE DNA Repair Mix and NEBNext Ultra II End Repair / dA-tailing Module reagents in accordance with manufacturer’s instructions, and place on ice.
For optimal performance, NEB recommend the following:
Thaw all reagents on ice.
Flick and/or invert the reagent tubes to ensure they are well mixed.
Note: Do not vortex the FFPE DNA Repair Mix or Ultra II End Prep Enzyme Mix.Always spin down tubes before opening for the first time each day.
The Ultra II End Prep Buffer and FFPE DNA Repair Buffer may have a little precipitate. Allow the mixture to come to room temperature and pipette the buffer up and down several times to break up the precipitate, followed by vortexing the tube for 30 seconds to solubilise any precipitate.
Note: It is important the buffers are mixed well by vortexing.The FFPE DNA Repair Buffer may have a yellow tinge and is fine to use if yellow.
-
Switch on the Tecan DreamPrep NGS robot and open the Fluent Control software on the computer. Follow the recommended specifications to initiate the DreamPrep NGS.

-
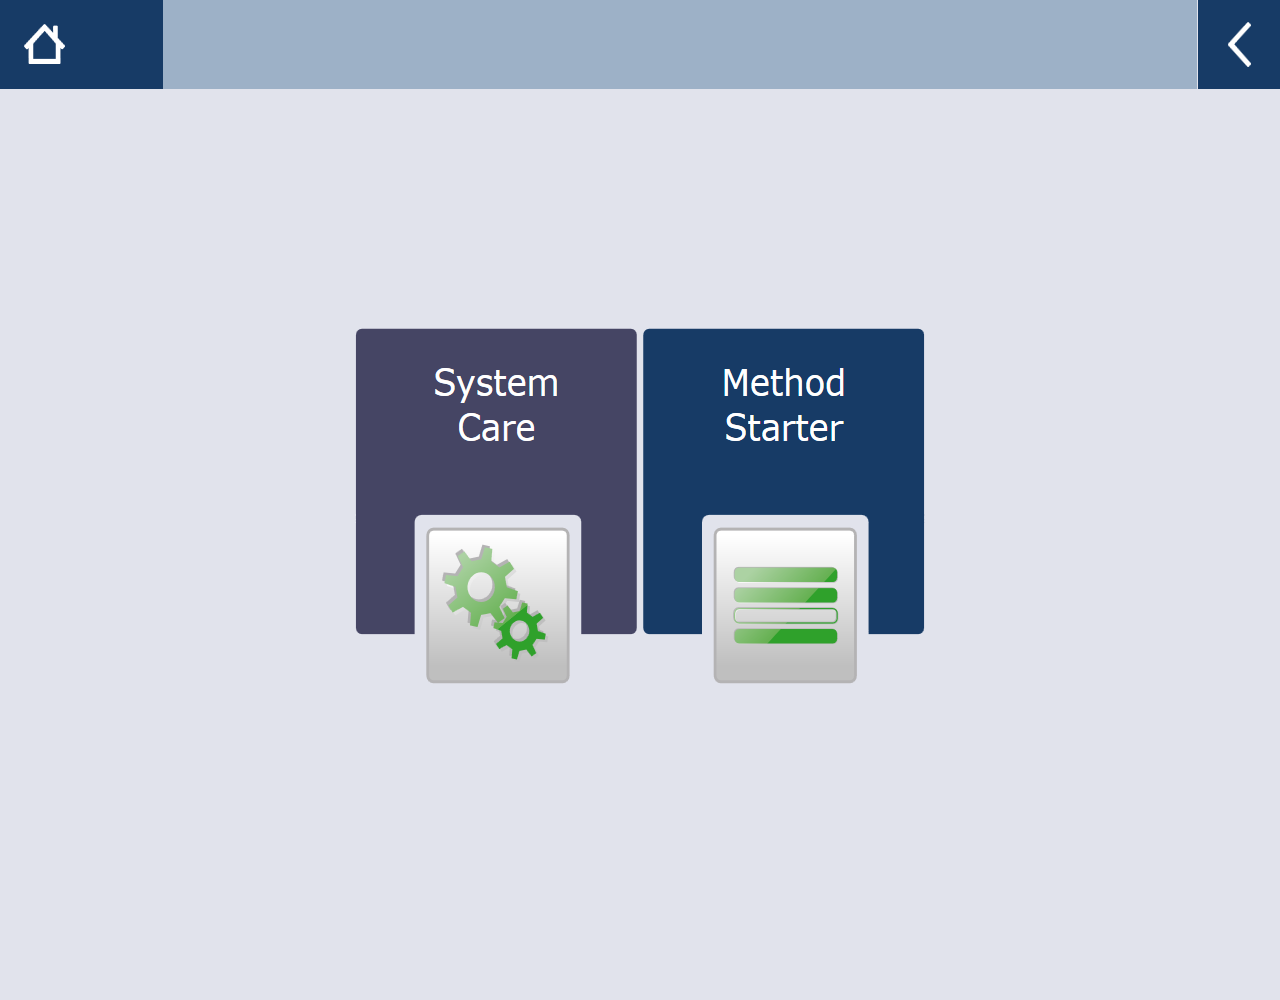
Users will have access to the 'Main screen' of TouchTools™, which allows interaction with the DreamPrep NGS system. Select 'Method Starter'.
-
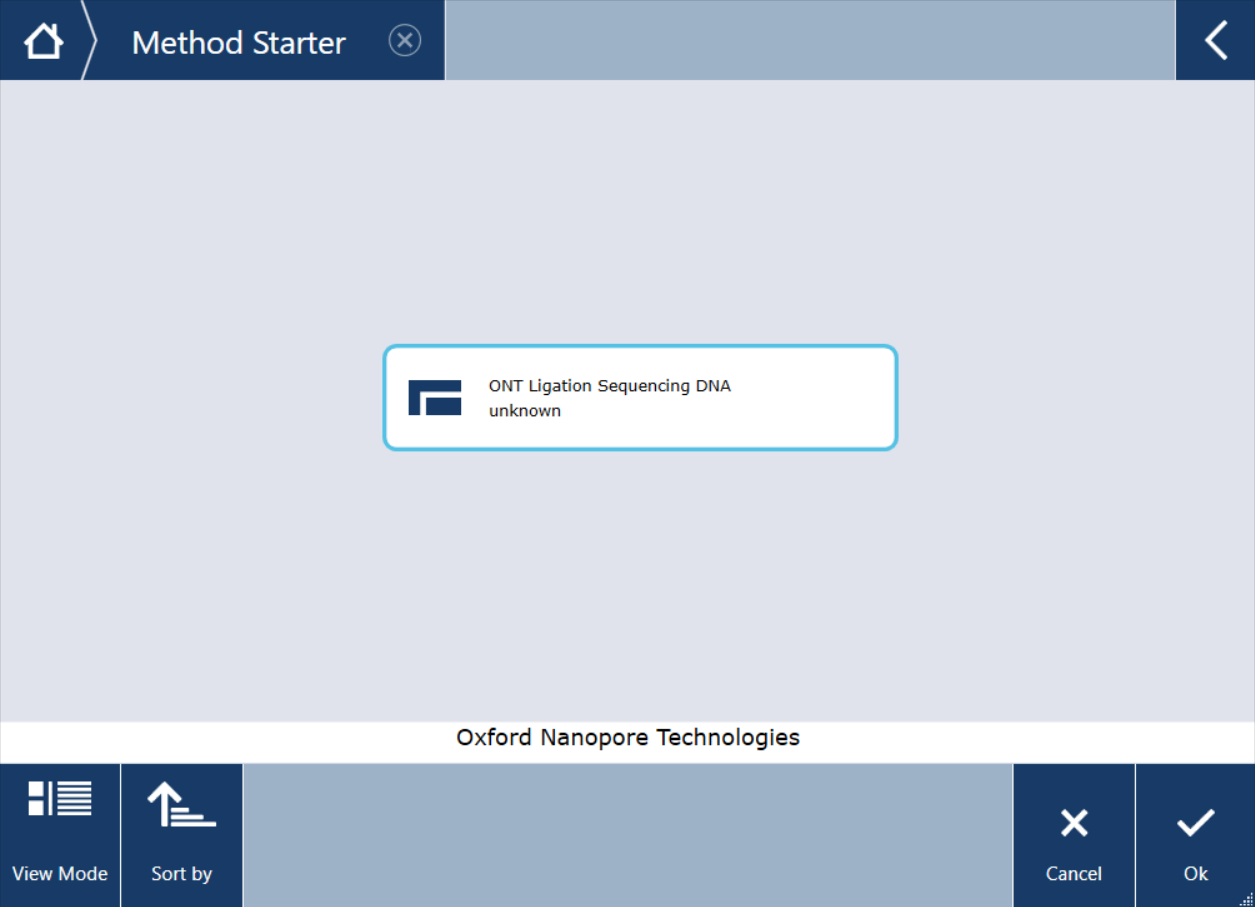
In the 'Method Starter' folder, select the Ligation sequencing program and click 'Ok'.
-
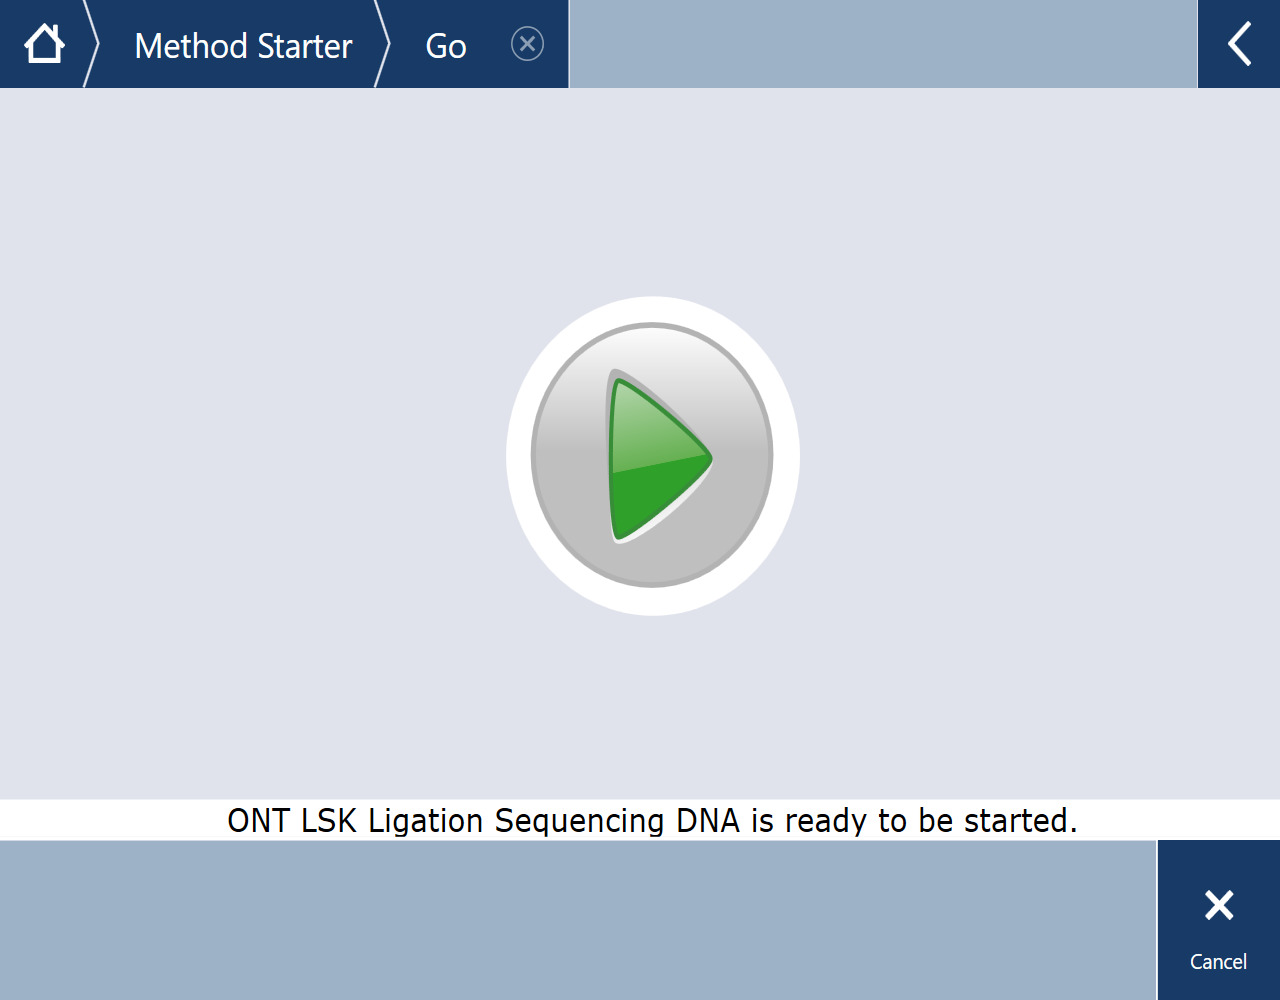
Click the 'start button' in the middle of the screen to start the run.
-
During the run set-up on the Tecan DreamPrep NGS, the workstation will perform automated checks and set-up for the ODTC.
During the run set-up, messages will pop-up regarding the ODTC set-up.
Allow these to complete and continue your run set-up as normal.
-
When you see the 'Welcome to the ONT Ligation Sequencing protocol by Tecan' page, click 'Continue'.

-
Set the 'User defined variables' and click on 'Next page' to proceed.
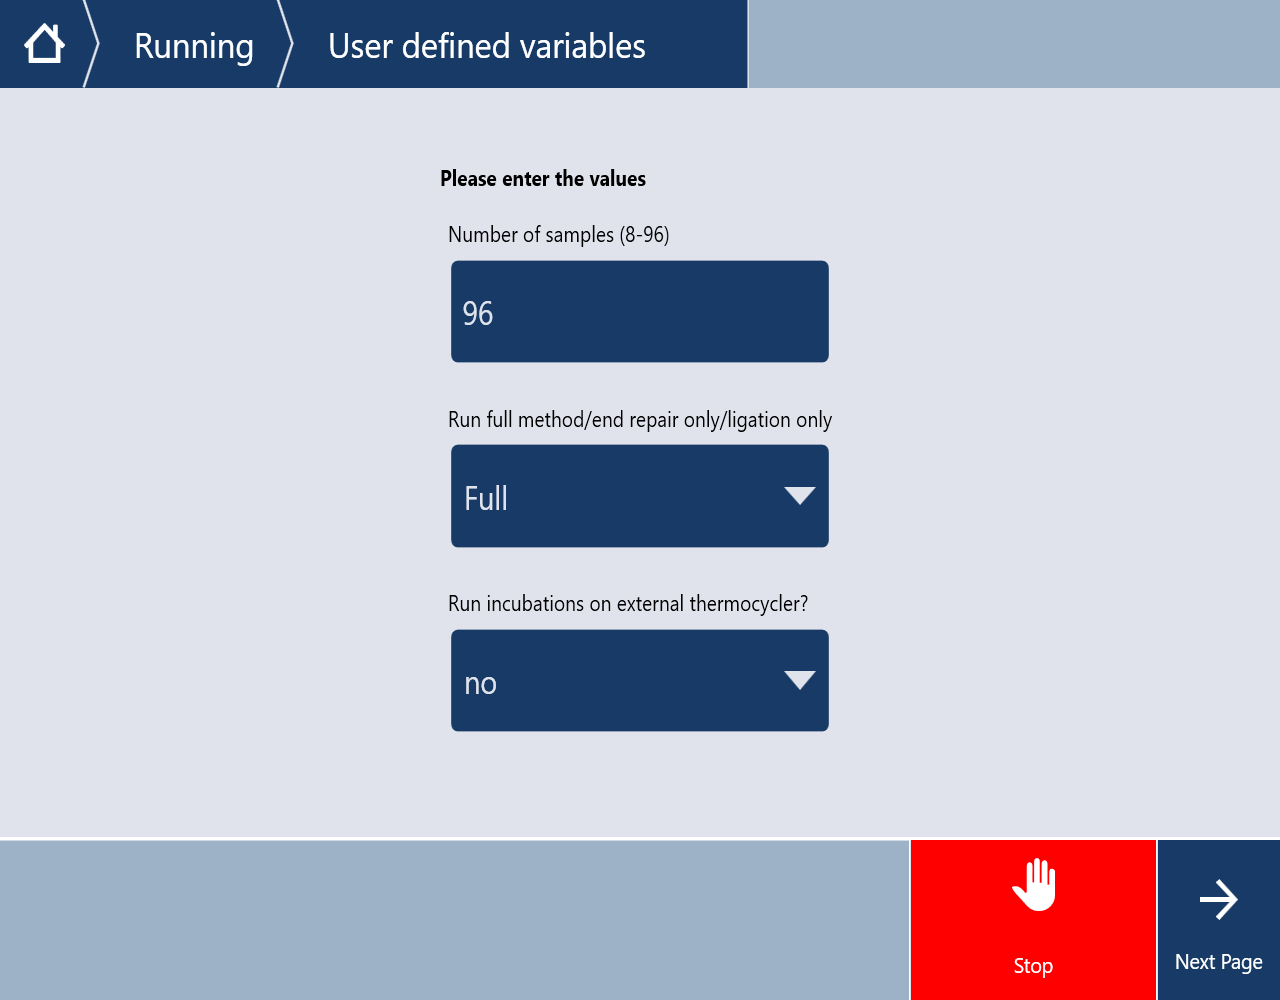
Note: Any number of samples between 8-96 can be processed using this protocol.
-
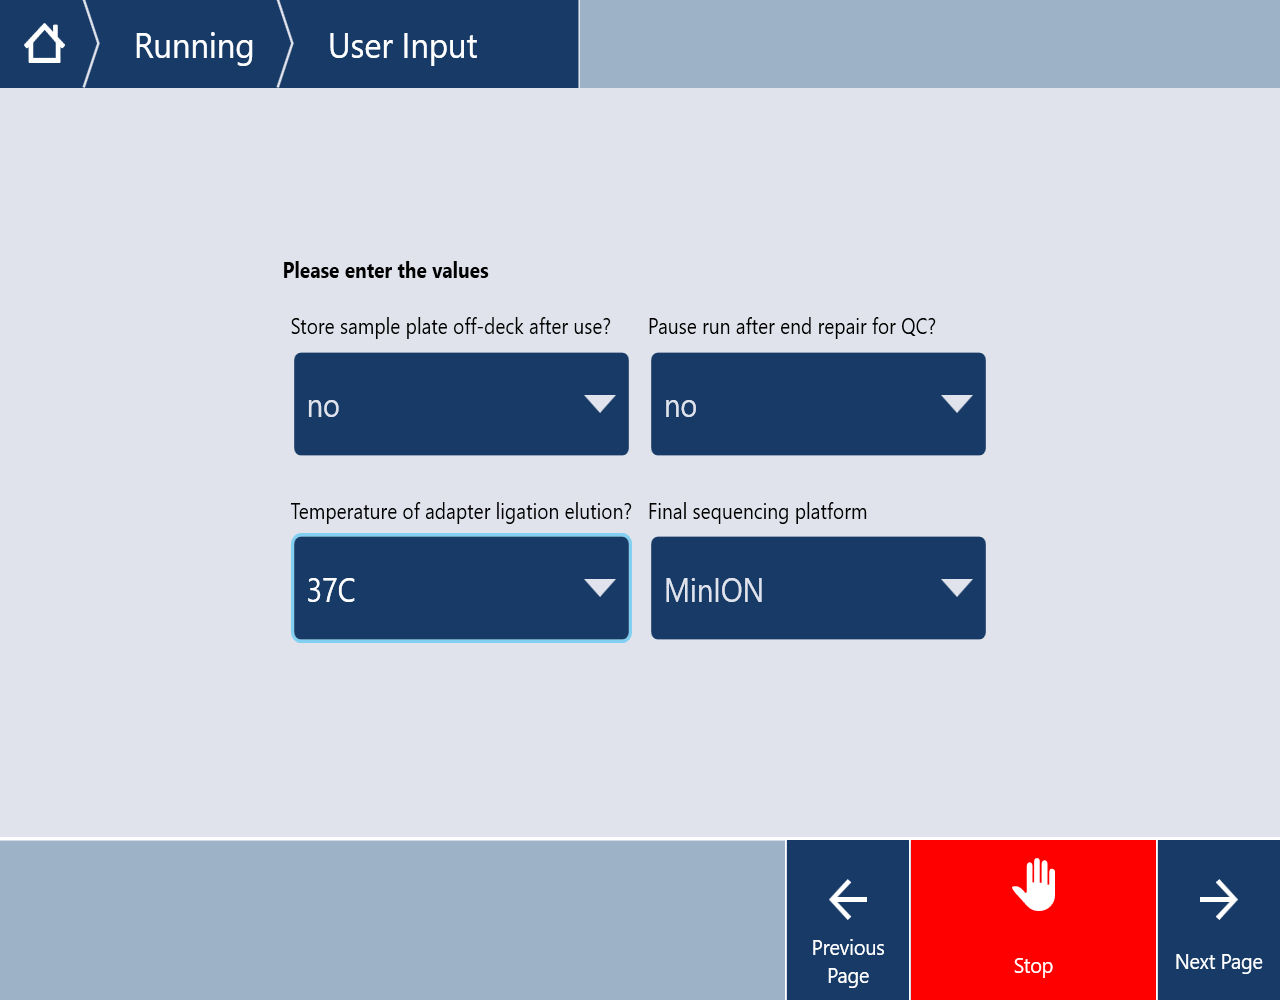
Set the 'User inputs' and click on 'Next page' to proceed.
- Please note that if removing the sample plate for off-deck storage, user interaction is required approximately 10 minutes after starting the run.
- We recommend room temperature for the majority of users. However, 37°C can be beneficial for recovery of longer DNA strands.
- The MinION option is valid for both the MinION and GridION device.
-
Optional actionReminder: If selecting 'YES' on 'Store Sample plate off-deck after use', user interaction will be required 10 minutes after starting the run. Click 'Next Page' to proceed.
-
Select if you would like to maintain the standard LSK volumes and timers as recommended by ONT and click on 'Next page' to proceed.
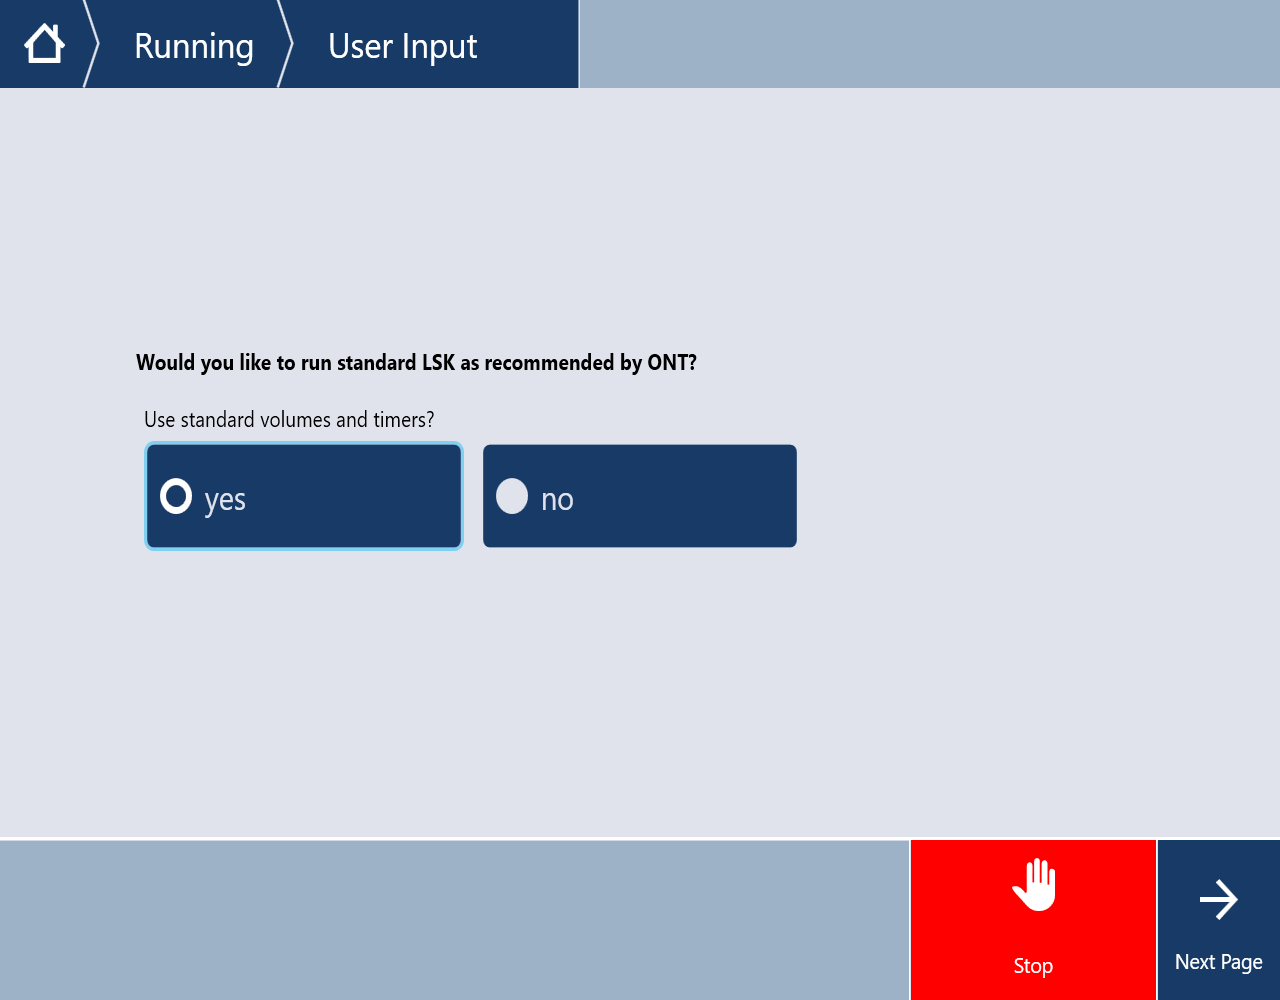
Note: Please note only the ONT recommended settings have been verified.
-
Optional actionIf using personalised volume and timer inputs:
- Select 'No' under 'Use standard volume and timers'.
Note: All categories will be autofilled with the recommended settings. These can be edited for personal requirements.
- Enter the desired reagent volumes for each sample in the 'End-repair' section I and II.
- Enter the desired length for each process in the 'End-repair' section of the protocol.
- Enter the desired reagent volumes for each sample in the 'Adapter ligation' section I and II.
- Enter the desired length for each process in the 'End-repair' section of the protocol.
-
Review the run variables and click 'Confirm':

-
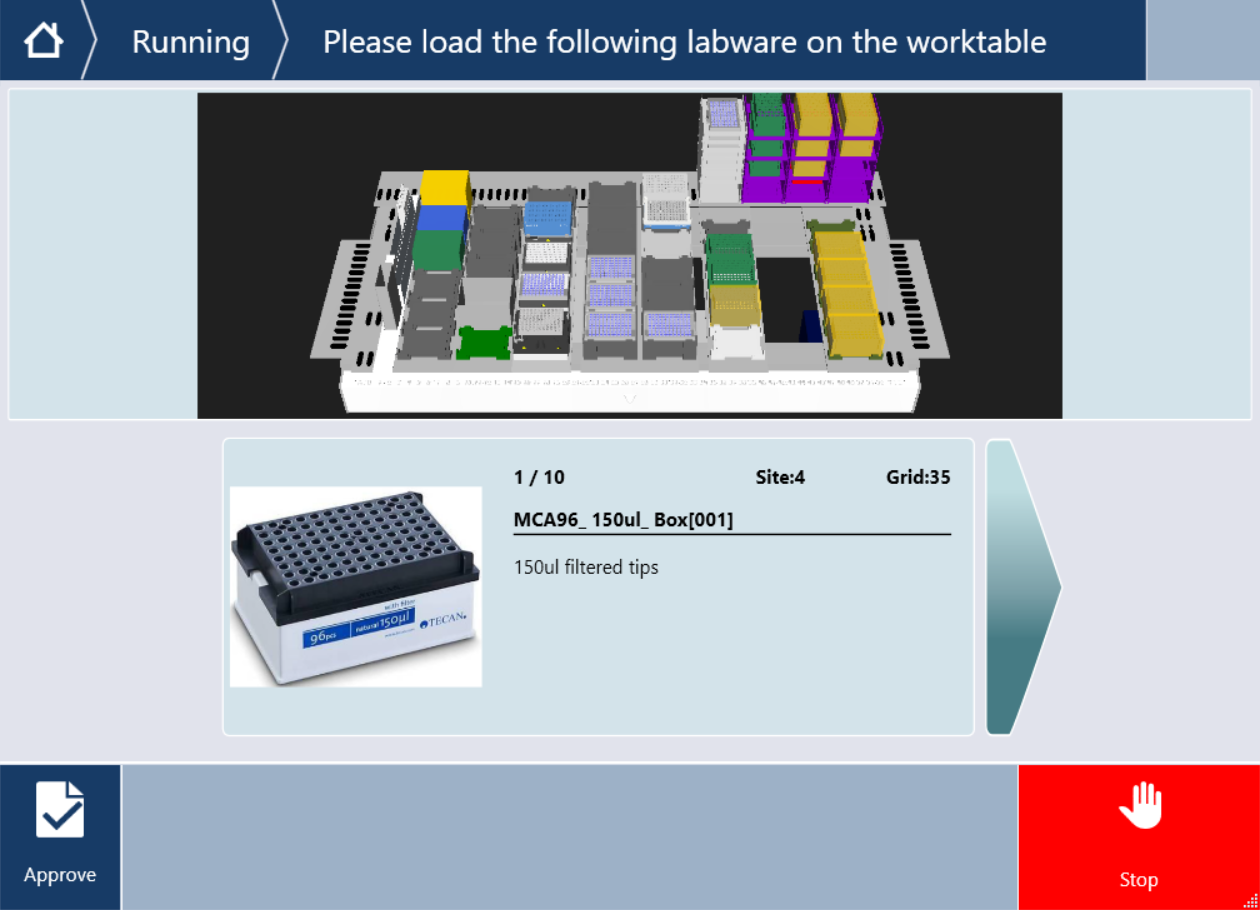
Follow the on-screen directions to load the 150 µl filtered tips for the Multichannel Arm 384/96 onto the worktable:
- The required loading position for each box will flash to indicate where to place the labware.
- Please load full tip boxes only, partially full boxes of filtered tips for the Multichannel Arm 384/96 are currently not supported.
- Click 'Approve' after each addition of labware to proceed to the next box.
- After loading all of the required labware, close the front safety shield and click 'Next Page' to proceed.
-
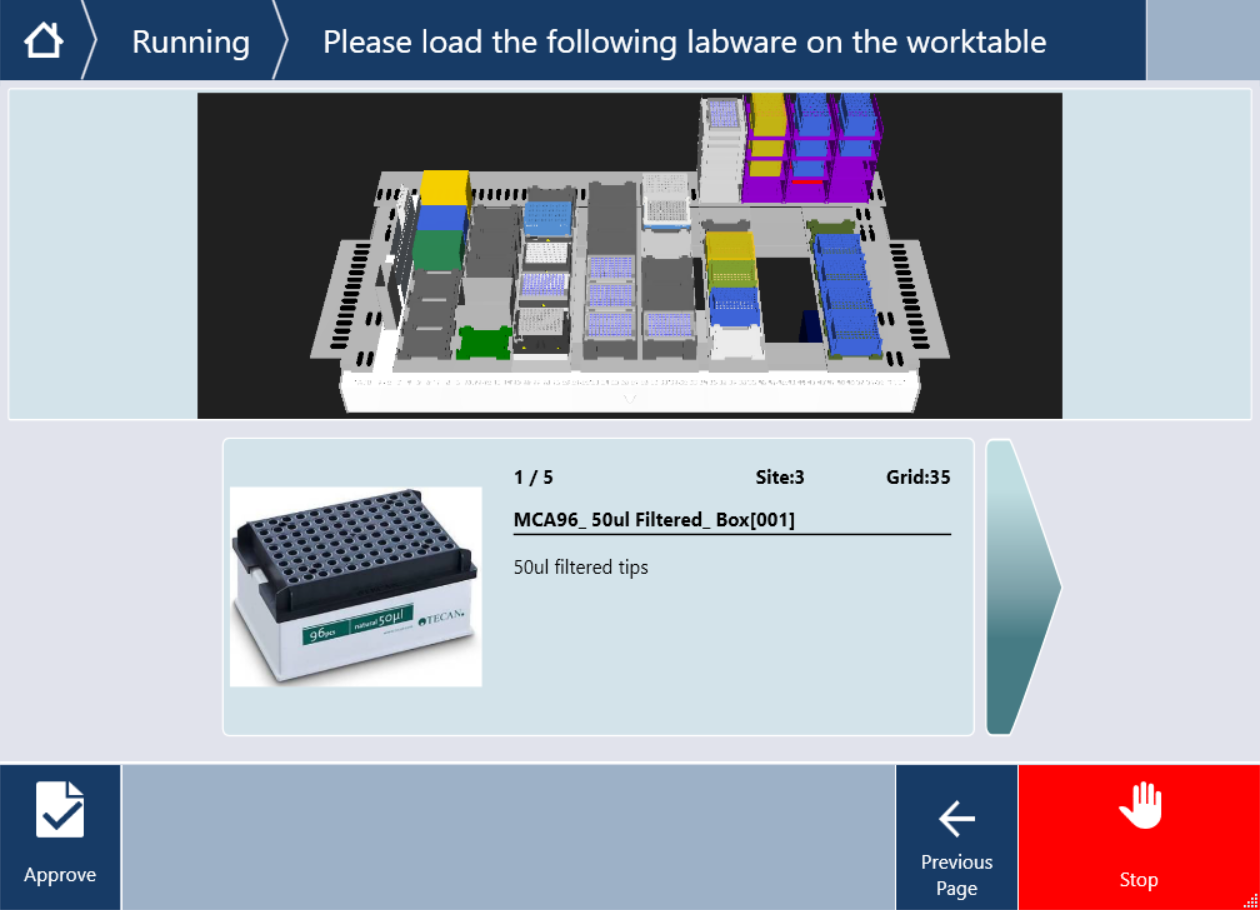
Follow the on-screen directions to load the 50 µl filtered tips for the Multichannel Arm 384/96 onto the worktable:
- The required loading position for each box will flash to indicate where to place the labware.
- Please load full tip boxes only, partially full boxes of filtered tips for the Multichannel Arm 384/96 are currently not supported.
- Click 'Approve' after each addition of labware to proceed to the next box.
- After loading all of the required labware, close the front safety shield and click 'Next Page' to proceed.
-
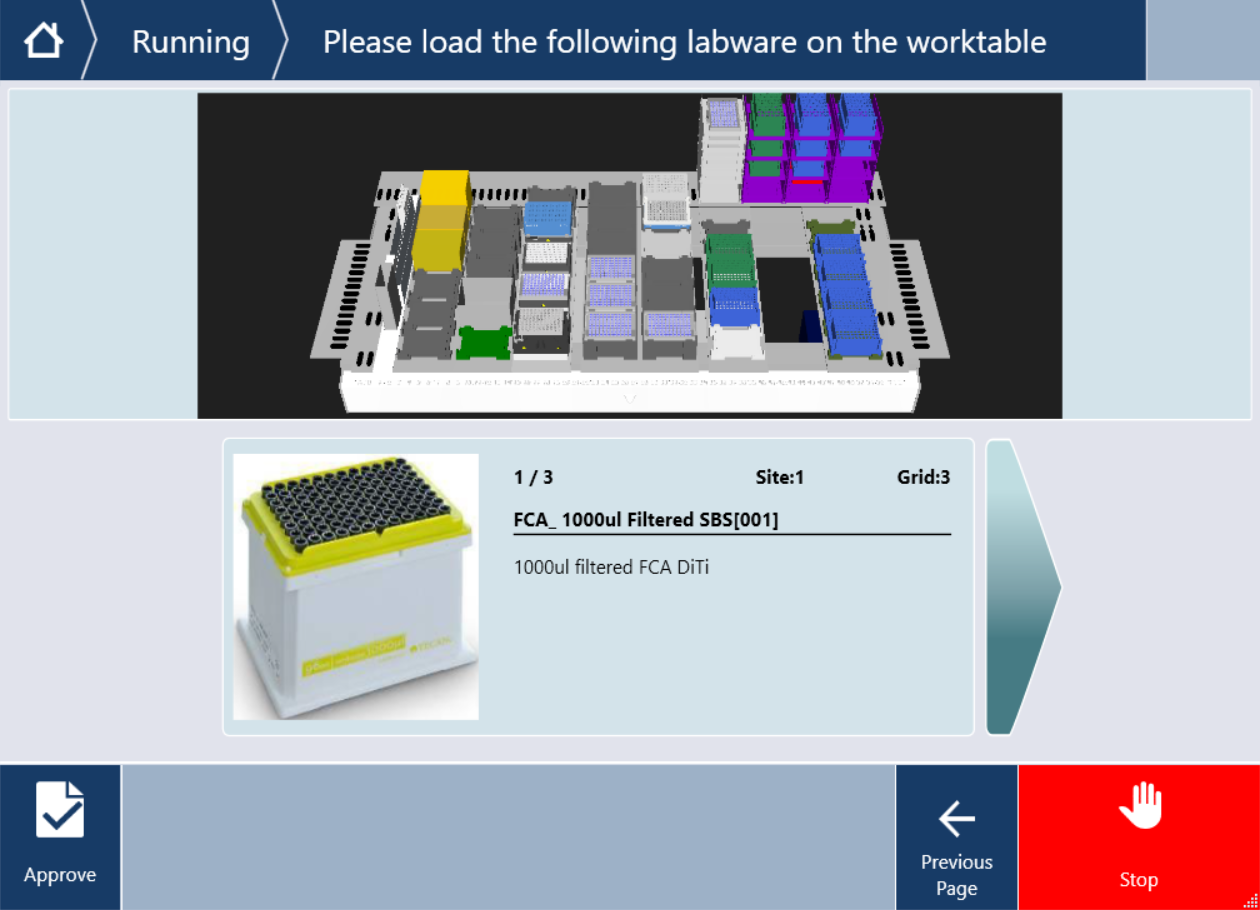
Follow the on-screen directions to load the 1000 µl Flexible Channel Arm filtered tips onto the worktable:
- The required loading position for each box will flash to indicate where to place the labware.
- Partially full boxes are supported for the Flexible Channel Arm filtered tips. However, please ensure the tip box contains the minimum required number of tips as described in the equipment and consumables section of this protocol.
- Click 'Approve' after each addition of labware to proceed to the next box.
-
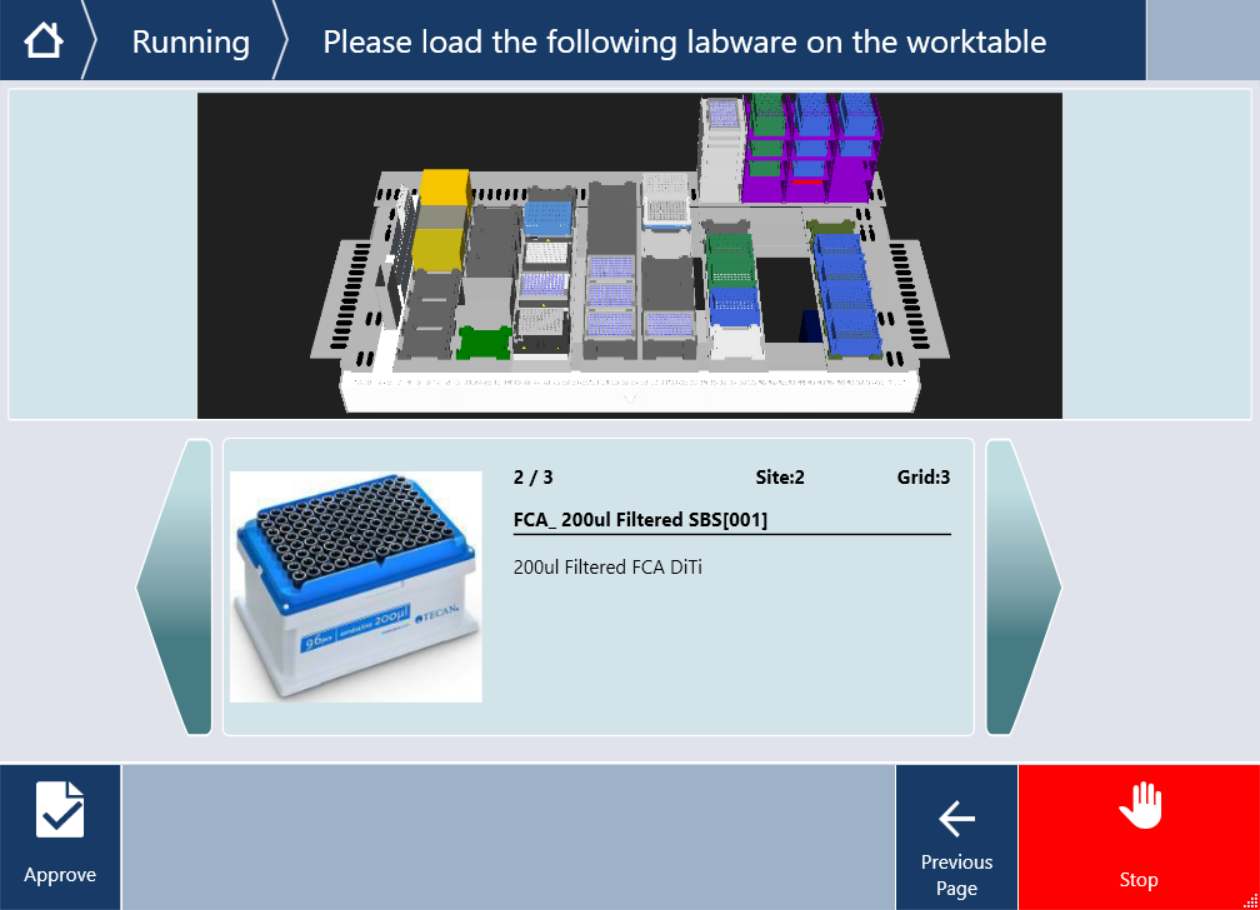
Follow the on-screen directions to load the 200 µl Flexible Channel Arm filtered tips onto the worktable:
- The required loading position for each box will flash to indicate where to place the labware.
- Partially full boxes are supported for the Flexible Channel Arm filtered tips. However, please ensure the tip box contains the minimum required number of tips as described in the equipment and consumables section of this protocol.
- Click 'Approve' after each addition of labware to proceed to the next box.
-
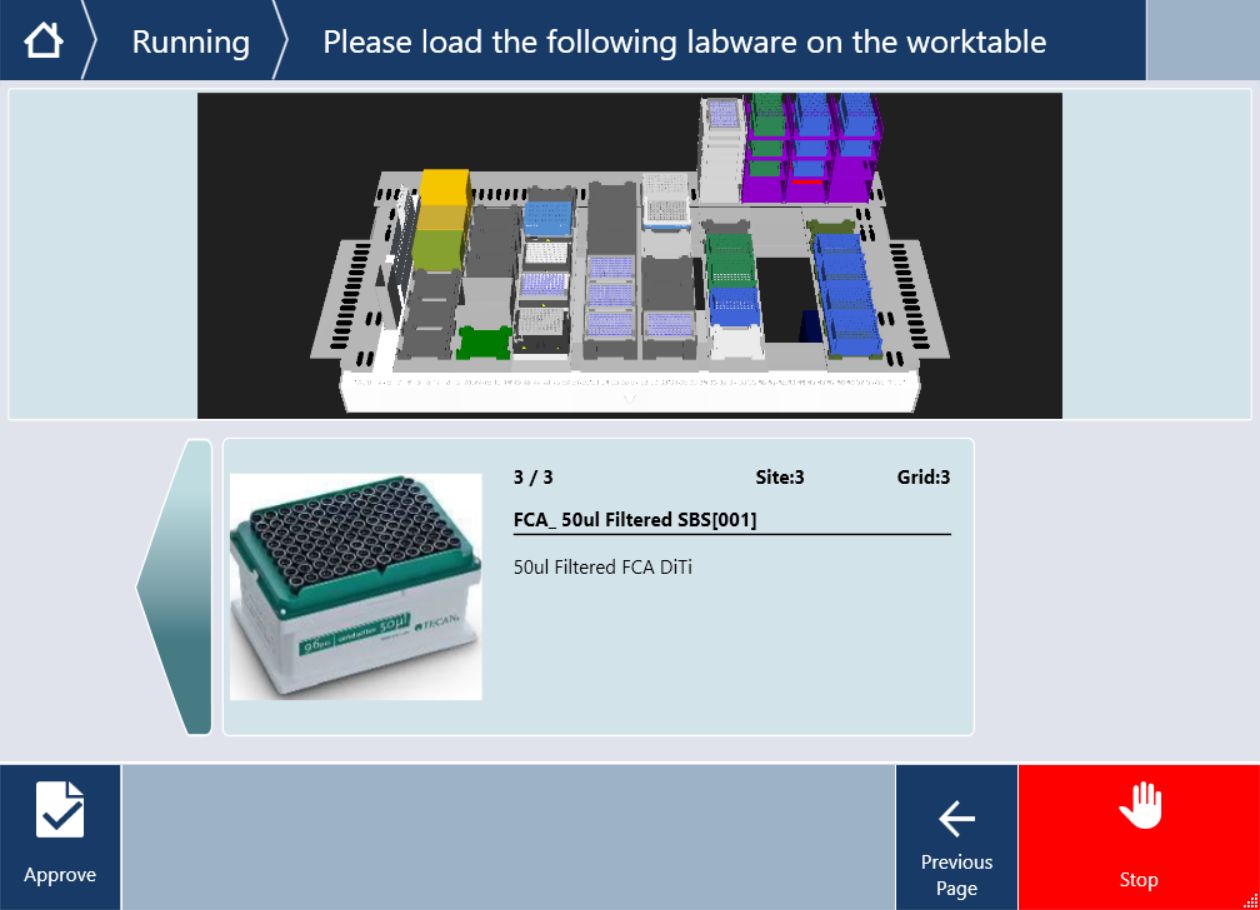
Follow the on-screen directions to load the 50 µl Flexible Channel Arm filtered tips onto the worktable:
- The required loading position for each box will flash to indicate where to place the labware.
- Partially full boxes are supported for the Flexible Channel Arm filtered tips. However, please ensure the tip box contains the minimum required number of tips as described in the equipment and consumables section of this protocol.
- Click 'Approve' after each addition of labware to proceed to the next box.
- After loading all of the required labware, click 'Next Page' to proceed.
-
Follow the on-screen directions to load the metal lid for ODTC on to the worktable:
- The required loading position will flash to indicate where to place the labware.
- Click 'Approve' after the addition of the metal lid for ODTC to proceed.
Loading the metal lid for ODTC: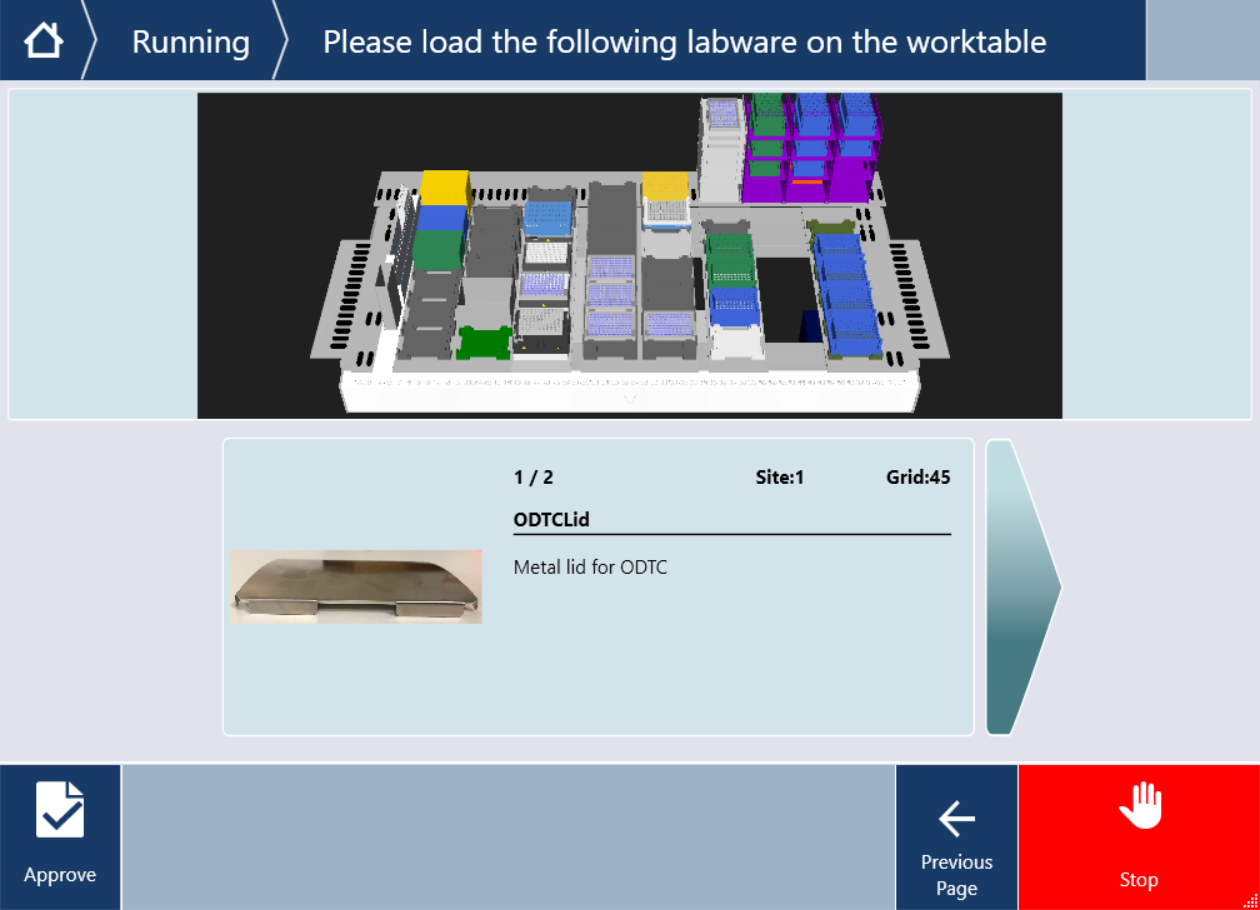
Note: Take care to position the metal lid centrally in the recess. Incorrect positioning of the metal lid can lead to run error.
-
Follow the on-screen directions to load the Waste plate on to the worktable:
- The required loading position will flash to indicate where to place the labware.
- After loading the Waste plate, click 'Next Page'.
Loading the Waste Plate: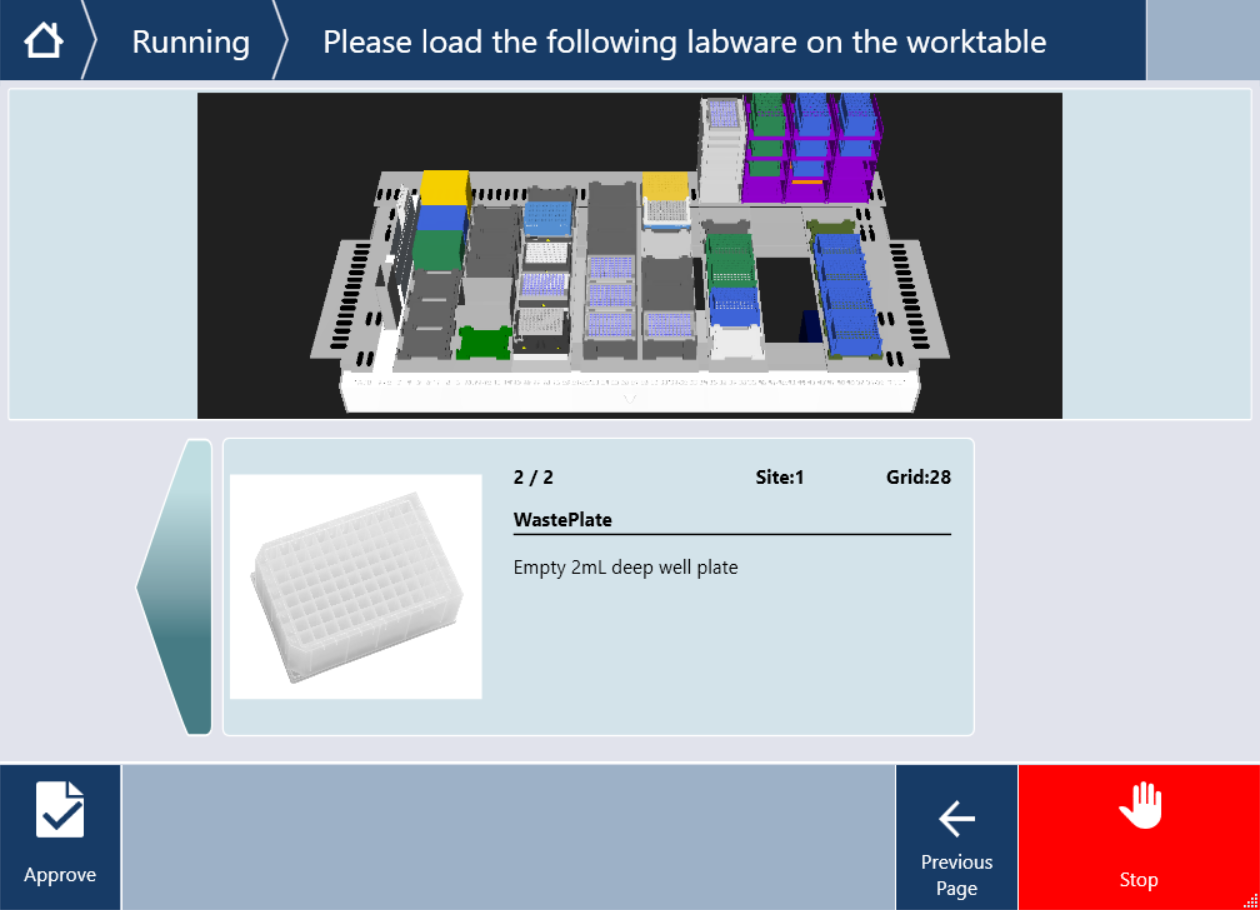
-
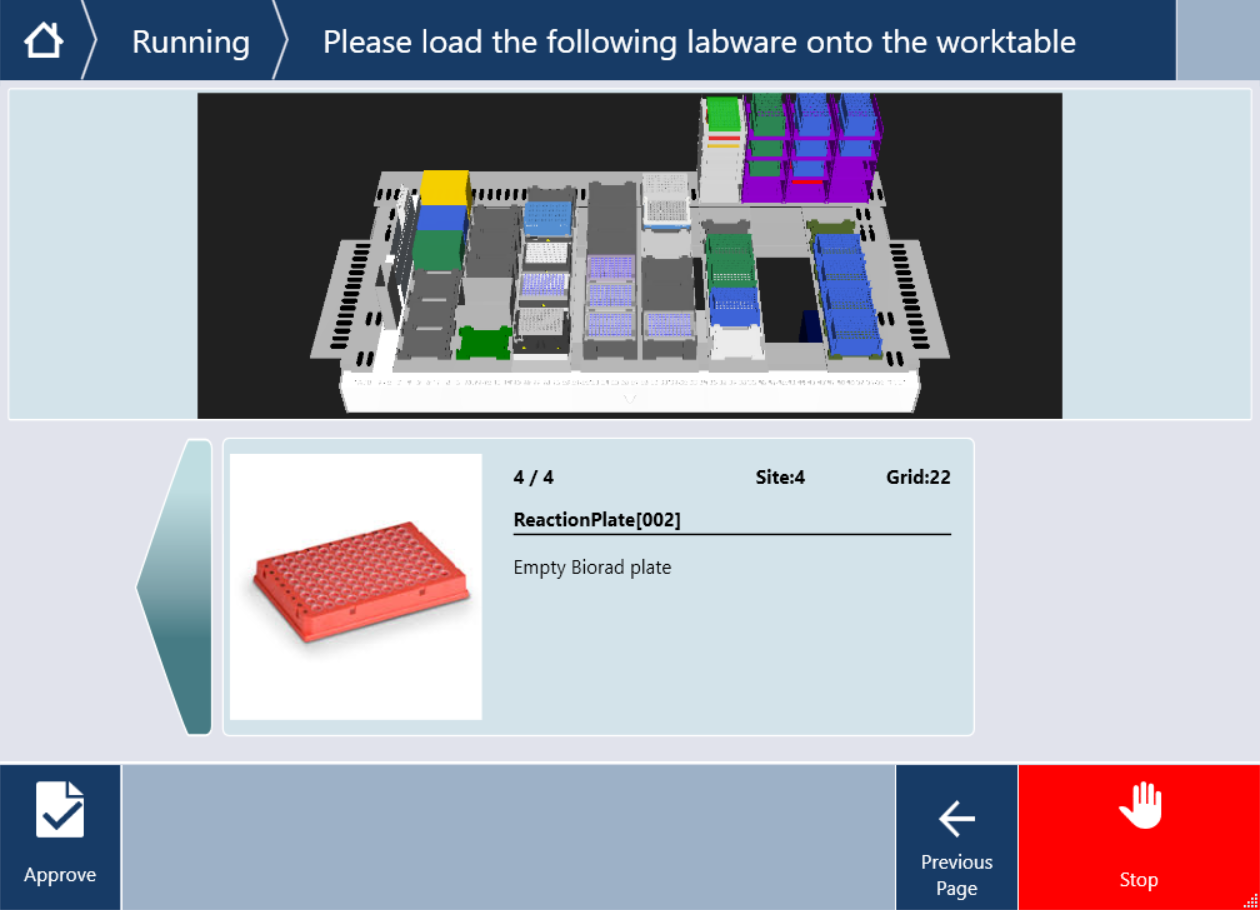
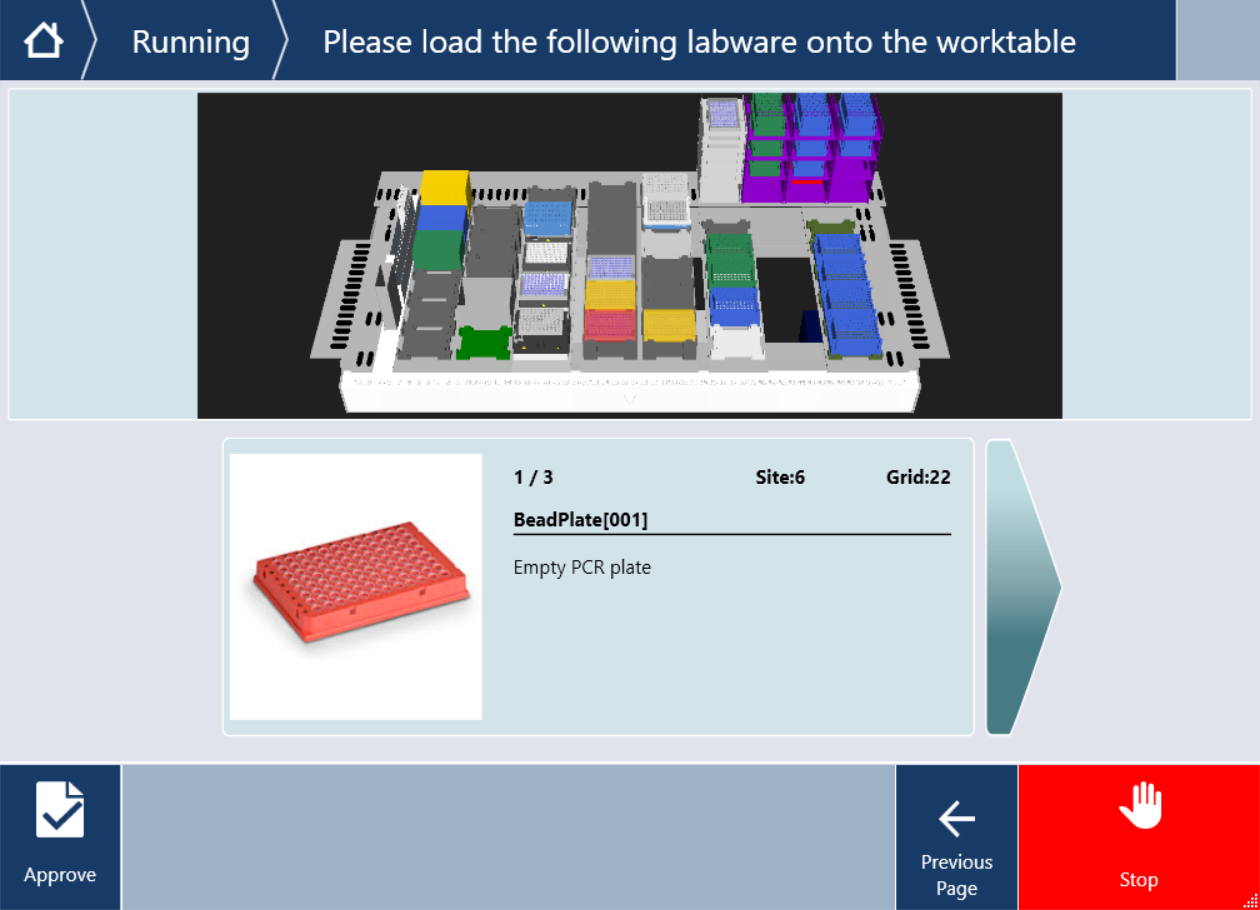
Follow the on-screen directions to load the reaction plates onto the worktable:
Incorrect positioning of the reaction plates will result in incorrect sample tracking throughout the run. Please ensure the reaction plates are placed on the worktable in the correct orientation:
- For the reaction plate(s) loaded in the 'Hotel': The lettered well markers (A-H) should be positioned towards the back of the worktable and the numbered well markers (1-12) should be positioned facing the right.
For the reaction plate(s) loaded onto the worktable: Follow standard plate orientation, with the lettered well markers (A-H) positioned to the left and the numbered well markers (1-12) positioned to towards the back of the worktable.
Note: We recommend all plates are labelled before placing on the worktable to ensure correct plate tracking.
The required loading position for each plate will flash on the on-screen display to indicate where to place the labware.
Click 'Approve' after each addition of labware to proceed.
After loading all of the required labware, click 'Next Page'.
-
Follow the on-screen directions to load the Bead plate, the Elution buffer plate and Ethanol plate on to the worktable:
- The required loading position will flash to indicate where to place the labware.
- Click 'Approve' after each addition of labware to proceed.
- After loading all of the required labware, click 'Next Page'.
Note: We recommend all plates are labelled before placing on the worktable to ensure correct plate tracking.
Loading the 'Bead plate':
Loading the 'Elution buffer plate':
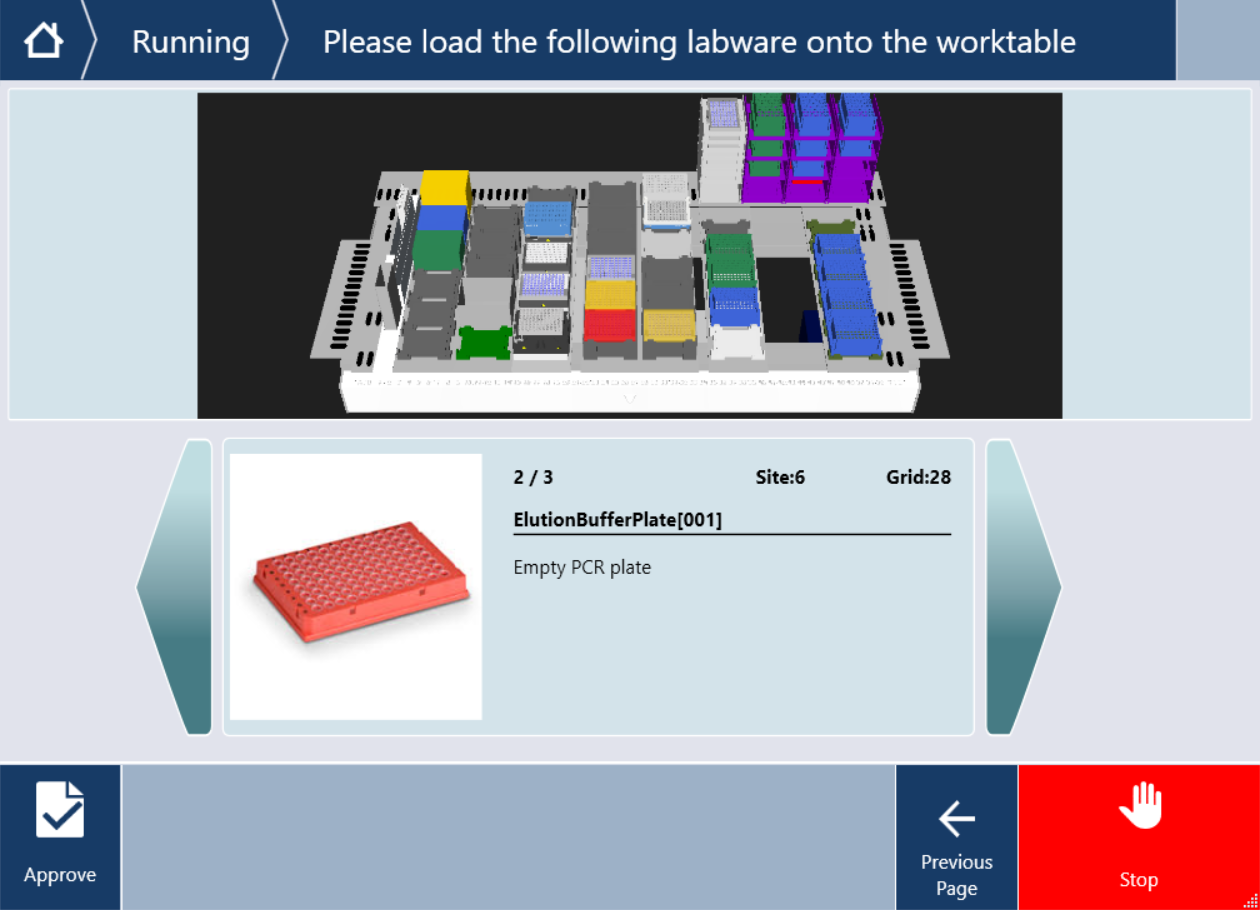
Loading the 'Ethanol plate':

-
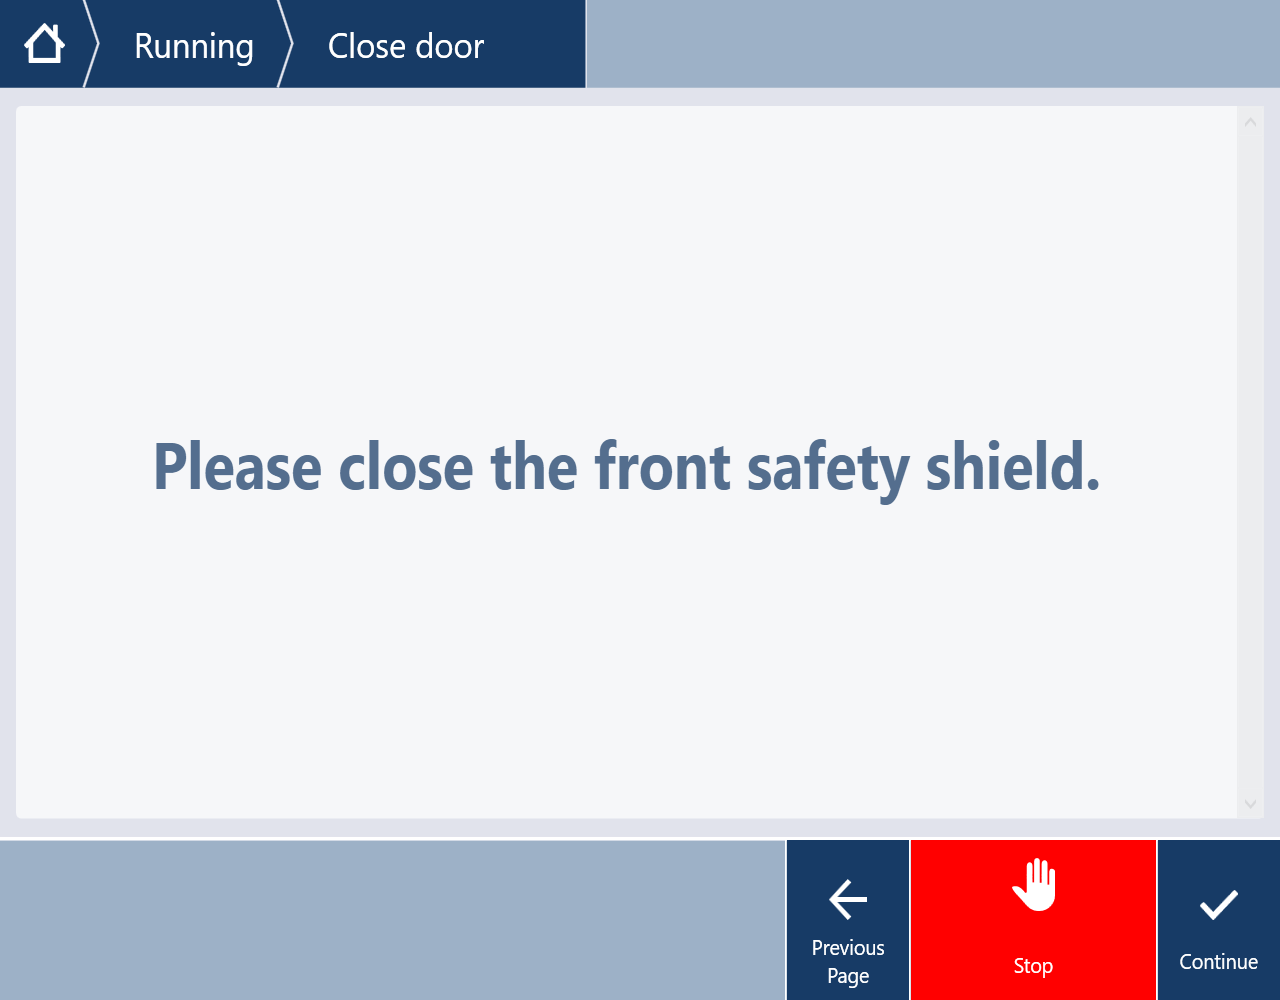
Close the front safety shield of the Tecan DreamPrep NGS while you prepare the reaction master mixes off-deck.
-
Prepare the End-prep (EP) master mix in a 2 ml Sarstedt tube with the following reagents according to the Tecan DreamPrep NGS user interface. Click 'OK' and 'Continue' to proceed.
We recommend master mixes are prepared fresh following the instructions below and loaded onto the workspace as soon as possible for optimal results.
- Ensure the master mix is homogenous by pipette mixing.
- Avoid the introduction of air bubbles while preparing the master mix.
- Avoid leaving droplets on the tube wall.
- Briefly spin down the End-prep (EP) master mix to ensure all the liquid is at the bottom of the Sarstedt tube.
Reagent volumes for all sample numbers:Reagent Volume per sample Volume X8 samples Volume X24 samples Volume X48 samples Volume X96 samples NEBNext FFPE DNA Repair Buffer 3.5 µl 36.4 µl 109.2 µl 201.6 µl 369.6 µl NEBNext FFPE DNA Repair Mix 2 µl 20.8 µl 62.4 µl 115.2 µl 211.2 µl Ultra II End-prep reaction buffer 3.5 µl 36.4 µl 109.2 µl 201.6 µl 369.6 µl Ultra II End-prep enzyme mix 3 µl 31.2 µl 93.6 µl 172.8 µl 316.8 µl Total 12 µl 124.8 µl 374.4 µl 691.2 µl 1267.2 µl Note: Reagent volumes will vary in accordance with the number of samples selected for processing (8-96). If processing a different sample input numbers, follow the instructions provided by the on-screen display for the correct reagent volumes.
Volumes indicated in the table and the on-screen display will include the necessary dead volume excess. -
Prepare the Adapter-ligation (AL) master mix directly into the 2 ml Sarstedt tube(s) with the following reagents according to the Tecan DreamPrep NGS user interface. Click 'OK' and 'Continue' to proceed.
We recommend master mixes are prepared fresh following the instructions below and loaded onto the workspace as soon as possible for optimal results.
- Ensure the master mix is homogenous by pipette mixing.
- Avoid the introduction of air bubbles while preparing the Adapter-ligation (AL) master mix.
- Avoid leaving droplets on the tube wall.
- Briefly spin down the Adapter-ligation (AL) master mix to ensure all the liquid is at the bottom of the Sarstedt tube(s).
Reagent volumes for preparation in each tube for all sample numbers:
Reagent Volume per sample Volume X8 samples Volume X24 samples Volume X48 samples Volume X96 samples Number of tubes to prepare - 1 1 2 4 Ligation Buffer (LNB) 25 µl 260 µl 780 µl 660 µl 660 µl NEBNext Quick T4 DNA Ligase 10 µl 104 µl 312 µl 264 µl 264 µl Ligation Adapter (LA) 5 µl 52 µl 156 µl 132 µl 132 µl Total volume in each tube - 416 µl 1,248 µl 1,056 µl 1,056 µl Total volume prepared - 416 µl 1,248 µl 2,112 µl 4,224 µl Note: Reagent volumes will vary in accordance with the number of samples selected for processing (8-96). If processing a different sample input numbers, follow the instructions provided by the on-screen display for the correct reagent volumes and split accordingly across the Sarstedt tube(s).
Volumes indicated in the table and the on-screen display will include the necessary dead volume excess. -
Load the DNA repair and end-prep master mix and Adapter ligation master mix prepared above in the 2 ml Sarstedt tubes into the required positions in the POGO tube holder by following the on-screen instructions.
- Ensure the master mixes are thoroughly mixed before loading.
- You will need to select each loading position using the Tecan's TouchTools touchscreen display.
- Follow the instructions on the display for each reagent, ensuring the fill volume for each tube is correct.
- Ensure the reagents have been added to all of the required positions before proceeding.
- Click 'Confirm' to proceed.
On-screen abbreviation glossary:
- End-prep master mix – EP
- Adapter ligation master mix – AL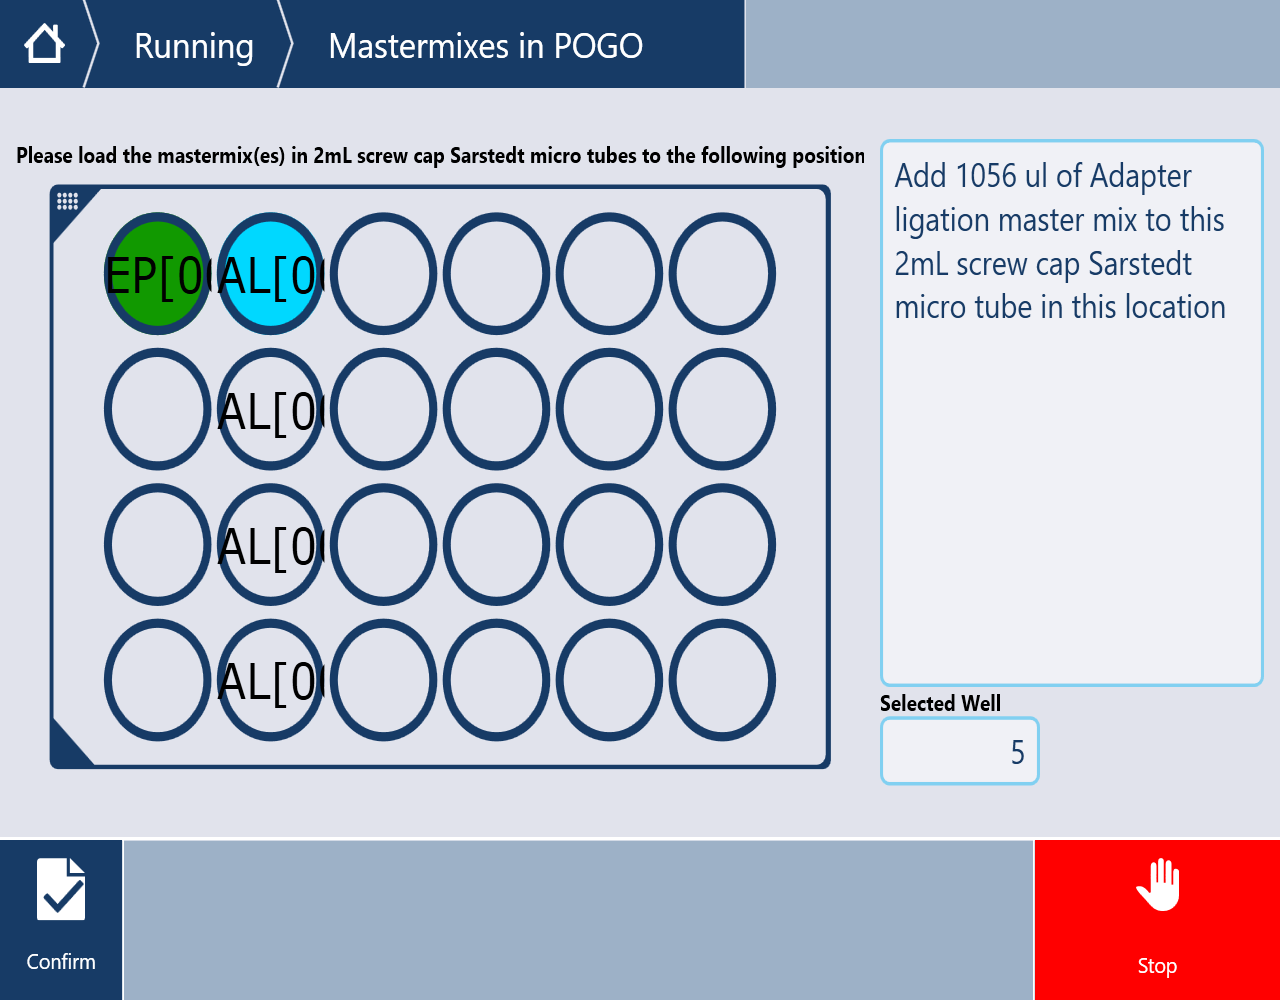
-
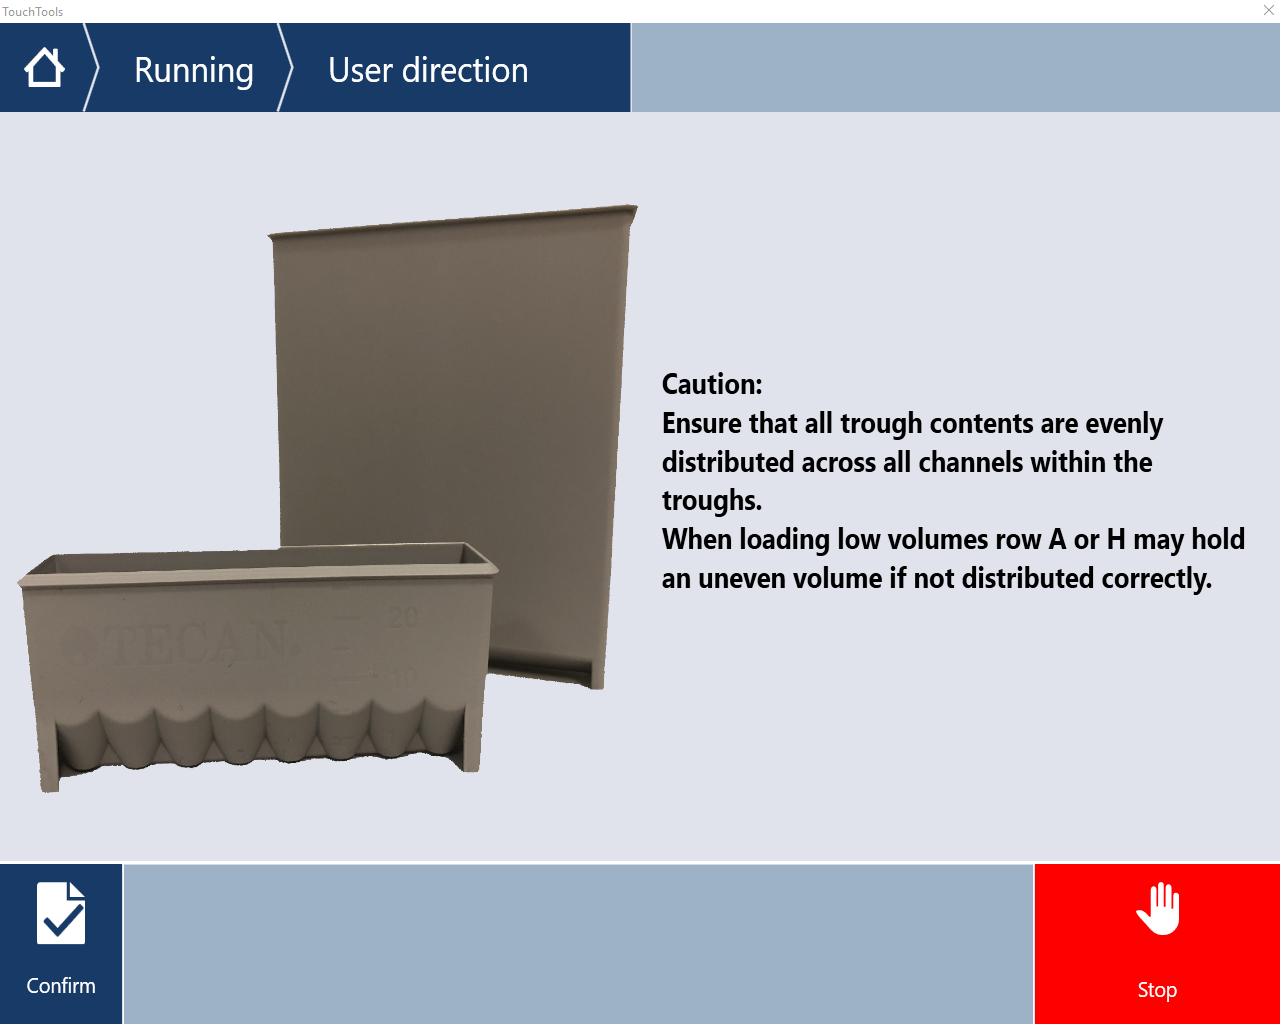
Gently tilt liquid in the trough backwards and forward a few times to generate a wet surface and allow the full volume to be evenly distributed.
Uneven distribution of the volume in the trough can be detrimental to the run.
-
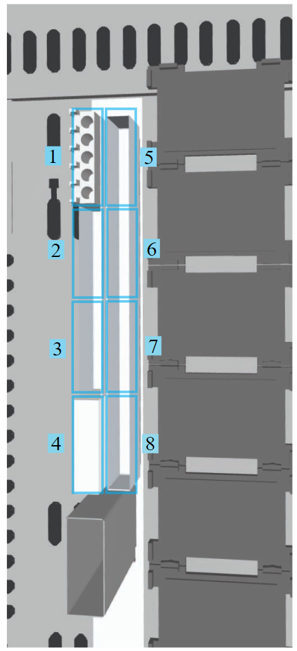
Trough mount sites:
Trough loading:
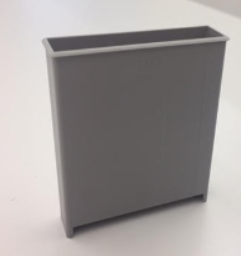
For the 100 ml troughs, dispense the required reagent volume directly into the trough and load on the the worktable. The 100 ml trough use will be reflected on the screen display with the following image:
For the 25 ml troughs, dispense the required reagent volume into the trough.
You will then need to insert the 25 ml trough into a 100 ml trough to act as a holder or use a re-useable metal insert (for more information on additional equipment contact your Tecan representative).
The modified 25 ml trough containing the reagent will then be loaded into the worktable. This input will be reflected on the screen display with the following image: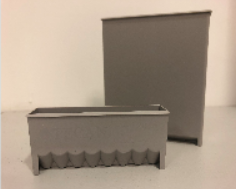
-
Load the troughs with their relevant reagents into the worktable by following the on-screen instructions.
- Ensure all the reagents have been thoroughly mixed by vortexing before dispensing into the troughs.
- The required loading position will flash to indicate where to insert the trough.
- Click 'Approve' after each addition to proceed.
- After loading all of the troughs, click 'Next Page'.
Note: Follow the on-screen instructions for the reagent fill volume and the required trough to use.- Site 2: Trough with fresh 80% ethanol.
- Site 3: Trough with AMPure XP Beads.
- Site 5: Trough with Long Fragment Buffer (LFB) or Short Fragment Buffer (SFB), depending on use.
- Site 6: Trough with Elution Buffer (EB).
- Site 7: Trough with nuclease-free water.
-
Close the front safety shield of the Tecan DreamPrep NGS while you prepare the sample plate off-deck.
-
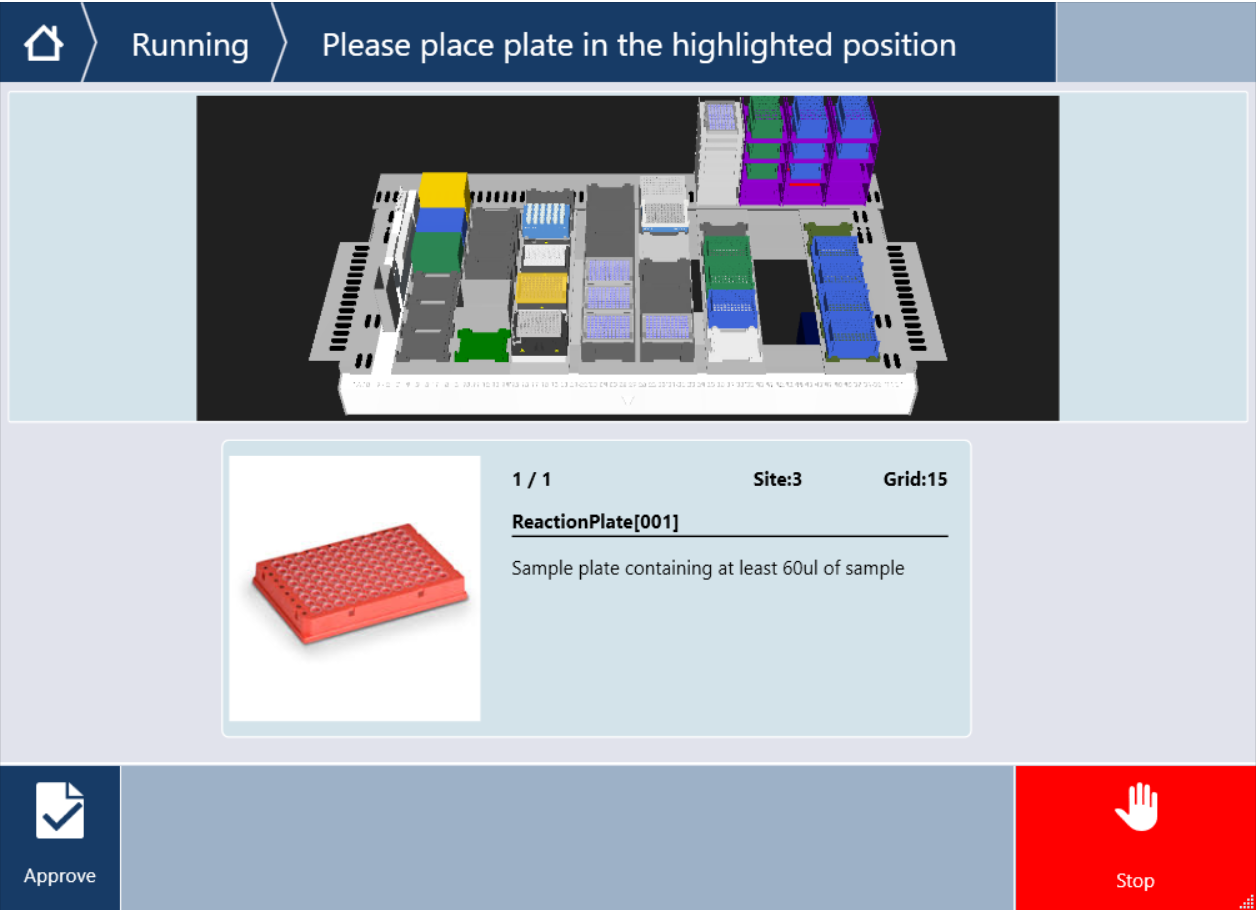
Follow the on-screen directions to load the sample plate on to the worktable:
- Quantify your sample input using a Qubit fluorometer (or equivalent).
- Per sample, transfer 1 μg (or 100-200 fmol) of input DNA into a well of the input plate.
- Adjust the volume to 60 μl with nuclease-free water.
- Mix thoroughly by pipetting.
- Spin down briefly in a microfuge.
- The required loading position will flash to indicate where to place the labware.
- Click 'Approve' after the addition of labware to proceed.
- After loading all of the required labware, click 'Next Page'.
-
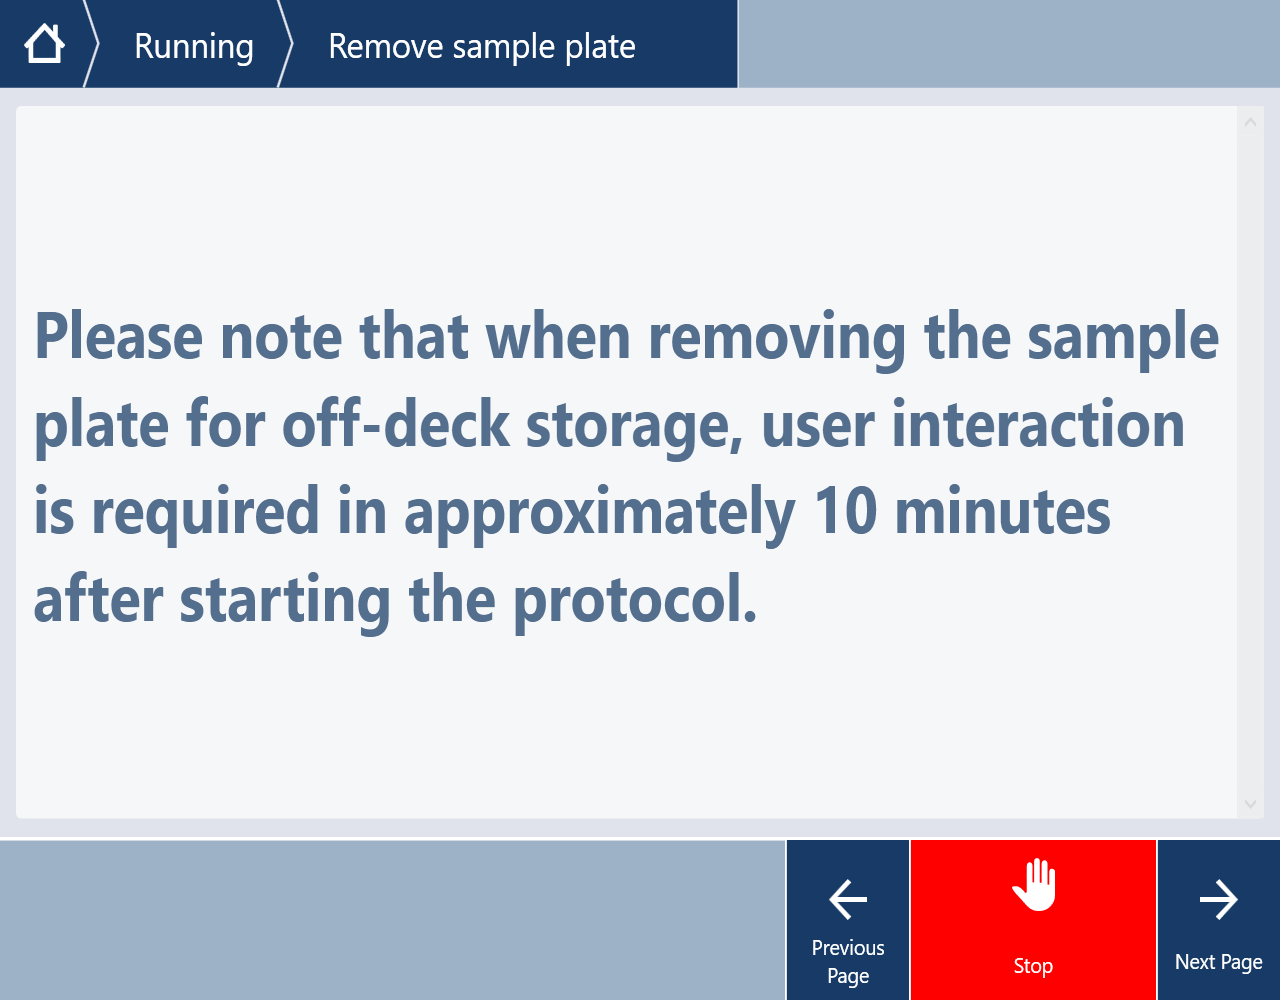
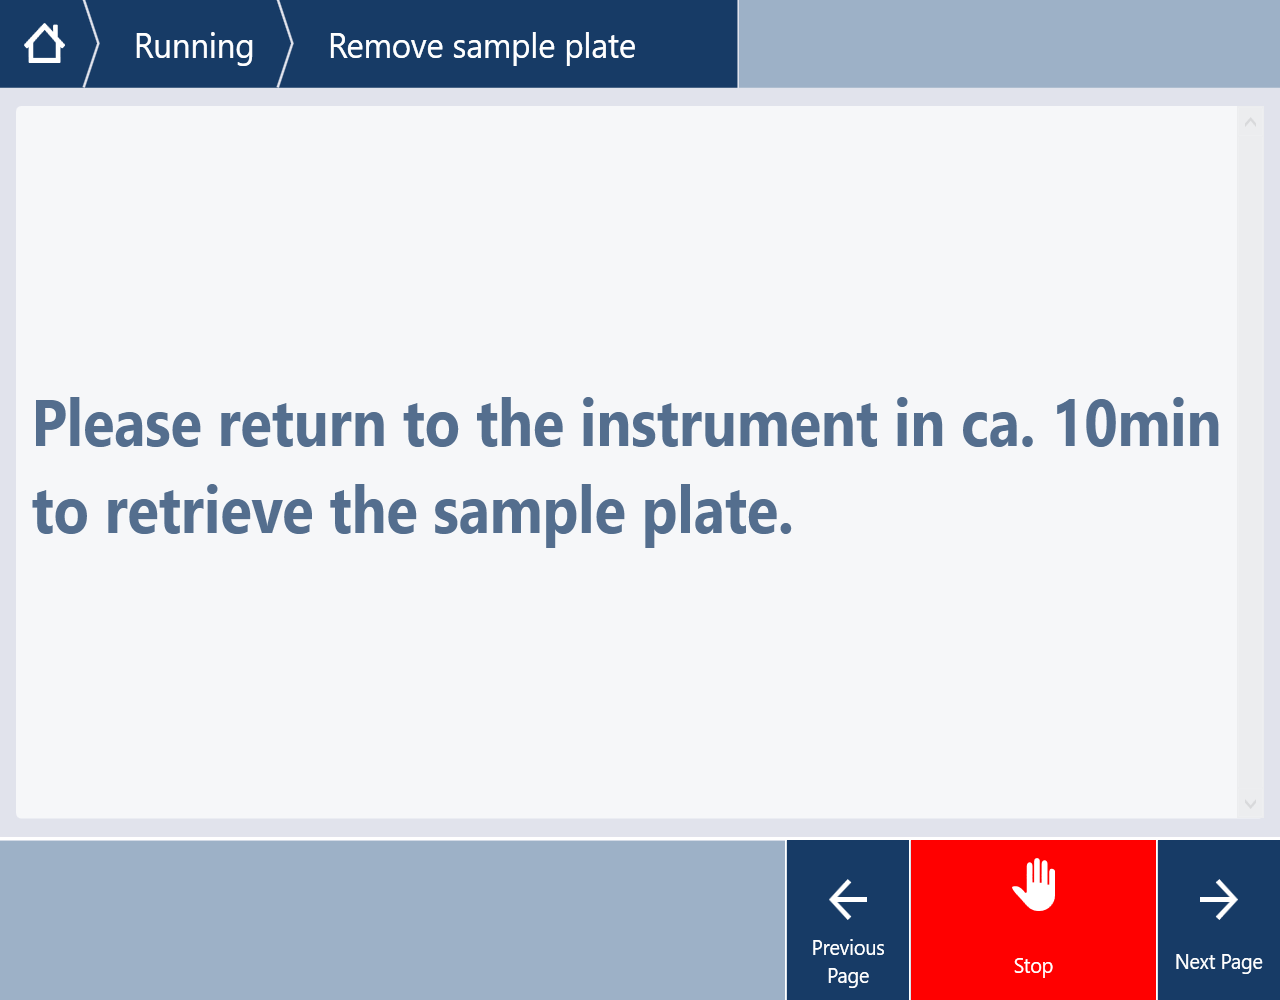
Optional actionIf removing the sample plate for off-deck storage, user interaction is required approximately 10 minutes after starting the run.
-
Close the front safety shield of the Tecan DreamPrep NGS before starting your run and click 'Continue'.
-
Click 'Confirm' and 'Continue' to start the automated library preparation.

-
Remove the plate containing the eluted libraries from the Tecan DreamPrep NGS deck.
-
Quantify 1 µl of each eluted sample from the output plate using a Qubit fluorometer plate reader off deck.
-
Depending on your required data output, prepare your final library to 35-50 fmol for high output of simplex data, or 10-20 fmol for duplex data, in 12 µl of Elution Buffer (EB).
Note: If the library yields are below the input recommendations, load the entire library.


