- Materials
-
- Flow Cell Wash Kit (EXP-WSH004)
- Sequencing Buffer (SB)
- Library Beads (LIB)
- Library Solution (LIS)
- Flow Cell Tether (FCT)
- Flow Cell Flush (FCF)
- Consumables
-
- 1.5 ml Eppendorf DNA LoBind tubes
- Equipment
-
- Vortex mixer
- Ice bucket with ice
- P1000 pipette and tips
- P200 pipette and tips
- P10 pipette and tips
-
Flow cell washing and reloading
Due to the low input material for the library preparation, low pore occupancy (<25% of active pore) can occur before enough data is generated for data analysis. Therefore, we recommend washing and reloading your flow cell with fresh library to maintain high data acquisition when approximately ~25% of active pores remain.
The Flow Cell Wash Kit removes most of the initial library as well as unblocking pores to prepare the flow cell for loading a new library for further sequencing. Pore availability can be viewed on the Pore Activity or the Pore Scan plot on MinKNOW.
-
Place the tube of Wash Mix (WMX) on ice. Do not vortex the tube.
-
Thaw one tube of Wash Diluent (DIL) at room temperature.
-
Mix the contents of Wash Diluent (DIL) thoroughly by vortexing, then spin down briefly and place on ice.
-
In a fresh 1.5 ml Eppendorf DNA LoBind tube, prepare the following Flow Cell Wash Mix:
Reagent Volume per flow cell Wash Mix (WMX) 2 μl Wash Diluent (DIL) 398 μl Total 400 μl -
Mix well by pipetting, and place on ice. Do not vortex the tube.
-
Pause the sequencing experiment in MinKNOW, and leave the flow cell in the device.
-
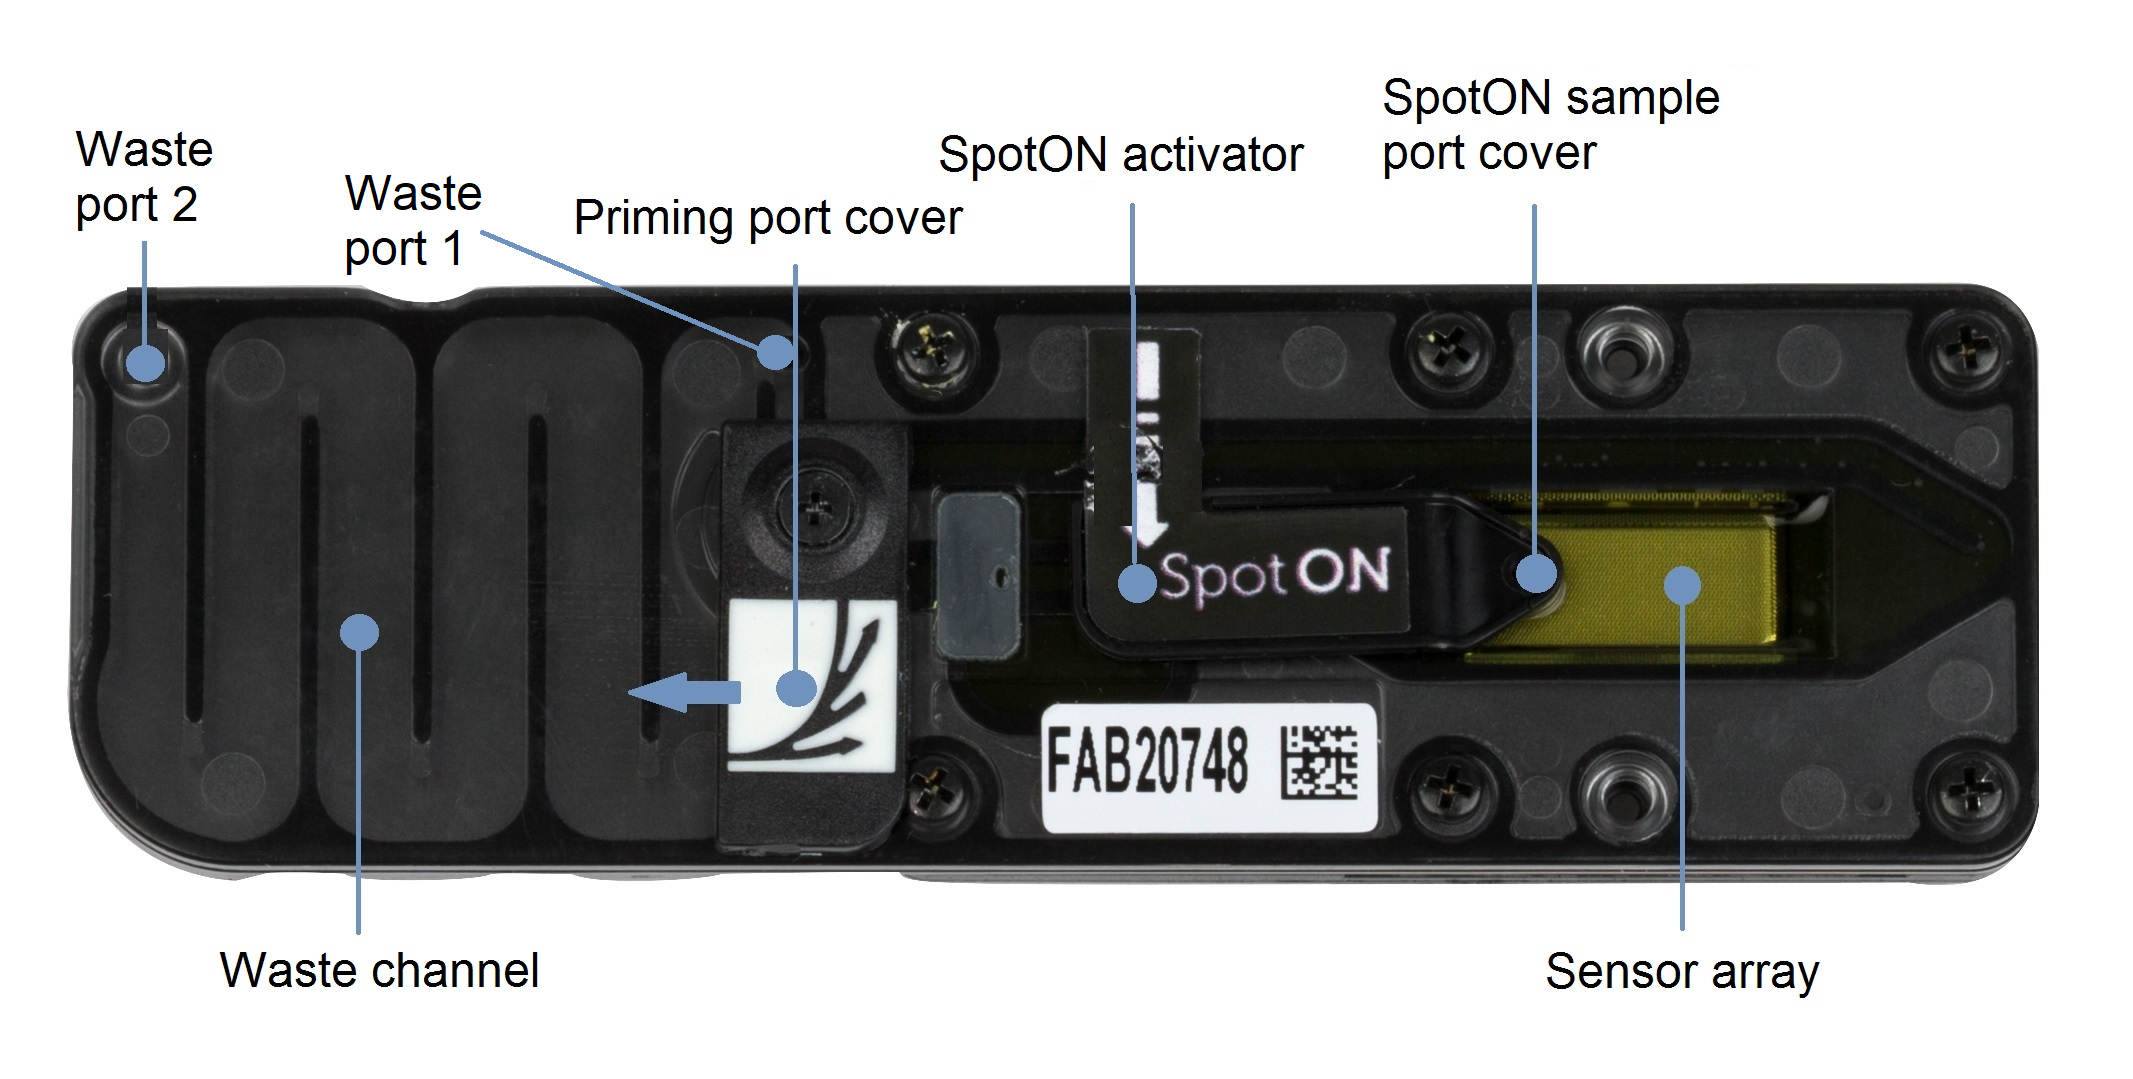
Remove the waste buffer, as follows:
- Close the priming port and SpotON sample port cover, as indicated in the figure below.
- Insert a P1000 pipette into waste port 1 and remove the waste buffer.
Note: As both the priming port and SpotON sample port are closed, no fluid should leave the sensor array area.
-
Slide the flow cell priming port cover clockwise to open.

-
After opening the priming port, check for a small air bubble under the cover. Draw back a small volume to remove any bubbles:
- Set a P1000 pipette to 200 µl.
- Insert the tip into the flow cell priming port.
- Turn the wheel until the dial shows 220-230 µl, or until you can see a small volume of buffer/liquid entering the pipette tip.
- Visually check that there is continuous buffer from the flow cell priming port across the sensor array.
-
Slowly load 200 µl of the prepared flow cell wash mix into the priming port, as follows:
- Using a P1000 pipette, take 200 µl of the flow cell wash mix
- Insert the pipette tip into the priming port, ensuring there are no bubbles in the tip
- Slowly twist the pipette wheel down to load the flow cell (if possible with your pipette) or push down the plunger very slowly, leaving a small volume of buffer in the pipette tip.
- Set a timer for a 5 minute incubation.
-
Once the 5 minute incubation is complete, carefully load the remaining 200 µl of the prepared flow cell wash mix into the priming port, as follows:
- Using a P1000 pipette, take the remaining 200 µl of the flow cell wash mix
- Insert the pipette tip into the priming port, ensuring there are no bubbles in the tip
- Slowly twist the pipette wheel down to load the flow cell (if possible with your pipette) or push down the plunger very slowly, leaving a small volume of buffer in the pipette tip.
-
Close the priming port and wait for 1 hour.

-
Remove the waste buffer, as follows:
- Ensure the priming port and SpotON sample port covers are closed, as indicated in the figure below.
- Insert a P1000 pipette into waste port 1 and remove the waste buffer.
Note: As both the priming port and SpotON sample port are closed, no fluid should leave the sensor array area.
-
Thaw the Sequencing Buffer (SB), Library Beads (LIB) or Library Solution (LIS, if using), Flow Cell Tether (FCT) and Flow Cell Flush (FCF) at room temperature before mixing by vortexing. Then spin down and store on ice.
-
To prepare the flow cell priming mix with BSA, combine Flow Cell Flush (FCF) and Flow Cell Tether (FCT), as directed below. Mix by pipetting at room temperature.
Note: We are in the process of reformatting our kits with single-use tubes into a bottle format. Please follow the instructions for your kit format.
Single-use tubes format:
Add 5 µl Bovine Serum Albumin (BSA) at 50 mg/ml and 30 µl Flow Cell Tether (FCT) directly to a tube of Flow Cell Flush (FCF).Bottle format:
In a suitable tube for the number of flow cells, combine the following reagents:Reagent Volume per flow cell Flow Cell Flush (FCF) 1,170 µl Bovine Serum Albumin (BSA) at 50 mg/ml 5 µl Flow Cell Tether (FCT) 30 µl Total volume 1,205 µl -
Slide the flow cell priming port cover clockwise to open the priming port.

-
After opening the priming port, check for a small air bubble under the cover. Draw back a small volume to remove any bubbles:
- Set a P1000 pipette to 200 µl.
- Insert the tip into the flow cell priming port.
- Turn the wheel until the dial shows 220-230 µl, or until you can see a small volume of buffer/liquid entering the pipette tip.
- Visually check that there is continuous buffer from the flow cell priming port across the sensor array.
-
Slowly load 800 µl of the priming mix into the priming port, as follows:
- Using a P1000 pipette, take 800 µl of the priming mix
- Insert the pipette tip into the priming port, ensuring there are no bubbles in the tip
- Slowly twist the pipette wheel down to load the flow cell (if possible with your pipette) or push down the plunger very slowly, as illustrated in the video above, leaving a small volume of buffer in the pipette tip.
-
Close the priming port and wait five minutes.
During this time, prepare the library for loading by following the steps below.
-
Thoroughly mix the contents of the Library Beads (LIB) by pipetting.
-
In a new 1.5 ml Eppendorf DNA LoBind tube, prepare the library for loading as follows:
Reagent Volume per flow cell Sequencing Buffer (SB) 37.5 µl Library Beads (LIB) mixed immediately before use, or Library Solution (LIS), if using 25.5 µl DNA library 12 µl Total 75 µl -
Remove the waste buffer, as follows:
- Ensure the priming port and SpotON sample port covers are closed, as indicated in the figure below.
- Insert a P1000 pipette into waste port 1 and remove the waste buffer.
Note: As both the priming port and SpotON sample port are closed, no fluid should leave the sensor array area.
-
Slide the flow cell priming port cover clockwise to open.
-
After opening the priming port, check for a small air bubble under the cover. Draw back a small volume to remove any bubbles:
- Set a P1000 pipette to 200 µl
- Insert the tip into the priming port
- Turn the wheel until the dial shows 220-230 µl, to draw back 20-30 µl, or until you can see a small volume of buffer entering the pipette tip
Note: Visually check that there is continuous buffer from the priming port across the sensor array.
-
Slowly load 200 µl of the priming mix into the flow cell priming port, as follows:
- Ensure the priming port is open and gently lift open the SpotON sample port.
- Using a P1000 pipette, take 200 µl of the priming mix
- Insert the pipette tip into the priming port, ensuring there are no bubbles in the tip
- Slowly twist the pipette wheel down to load the flow cell (if possible with your pipette) or push down the plunger very slowly, as illustrated in the video above, leaving a small volume of buffer in the pipette tip.
-
Remove the waste buffer, as follows:
- Close the priming port and SpotON sample port cover, as indicated in the figure below.
- Insert a P1000 pipette into waste port 1 and remove the waste buffer.
Note: As both the priming port and SpotON sample port are closed, no fluid should leave the sensor array area.
-
Slide open the priming port cover and gently lift open the SpotON sample port cover.
-
Mix the prepared library gently by pipetting up and down just prior to loading.
-
Add 75 μl of the prepared library to the flow cell via the SpotON sample port in a dropwise fashion. Ensure each drop flows into the port before adding the next.
-
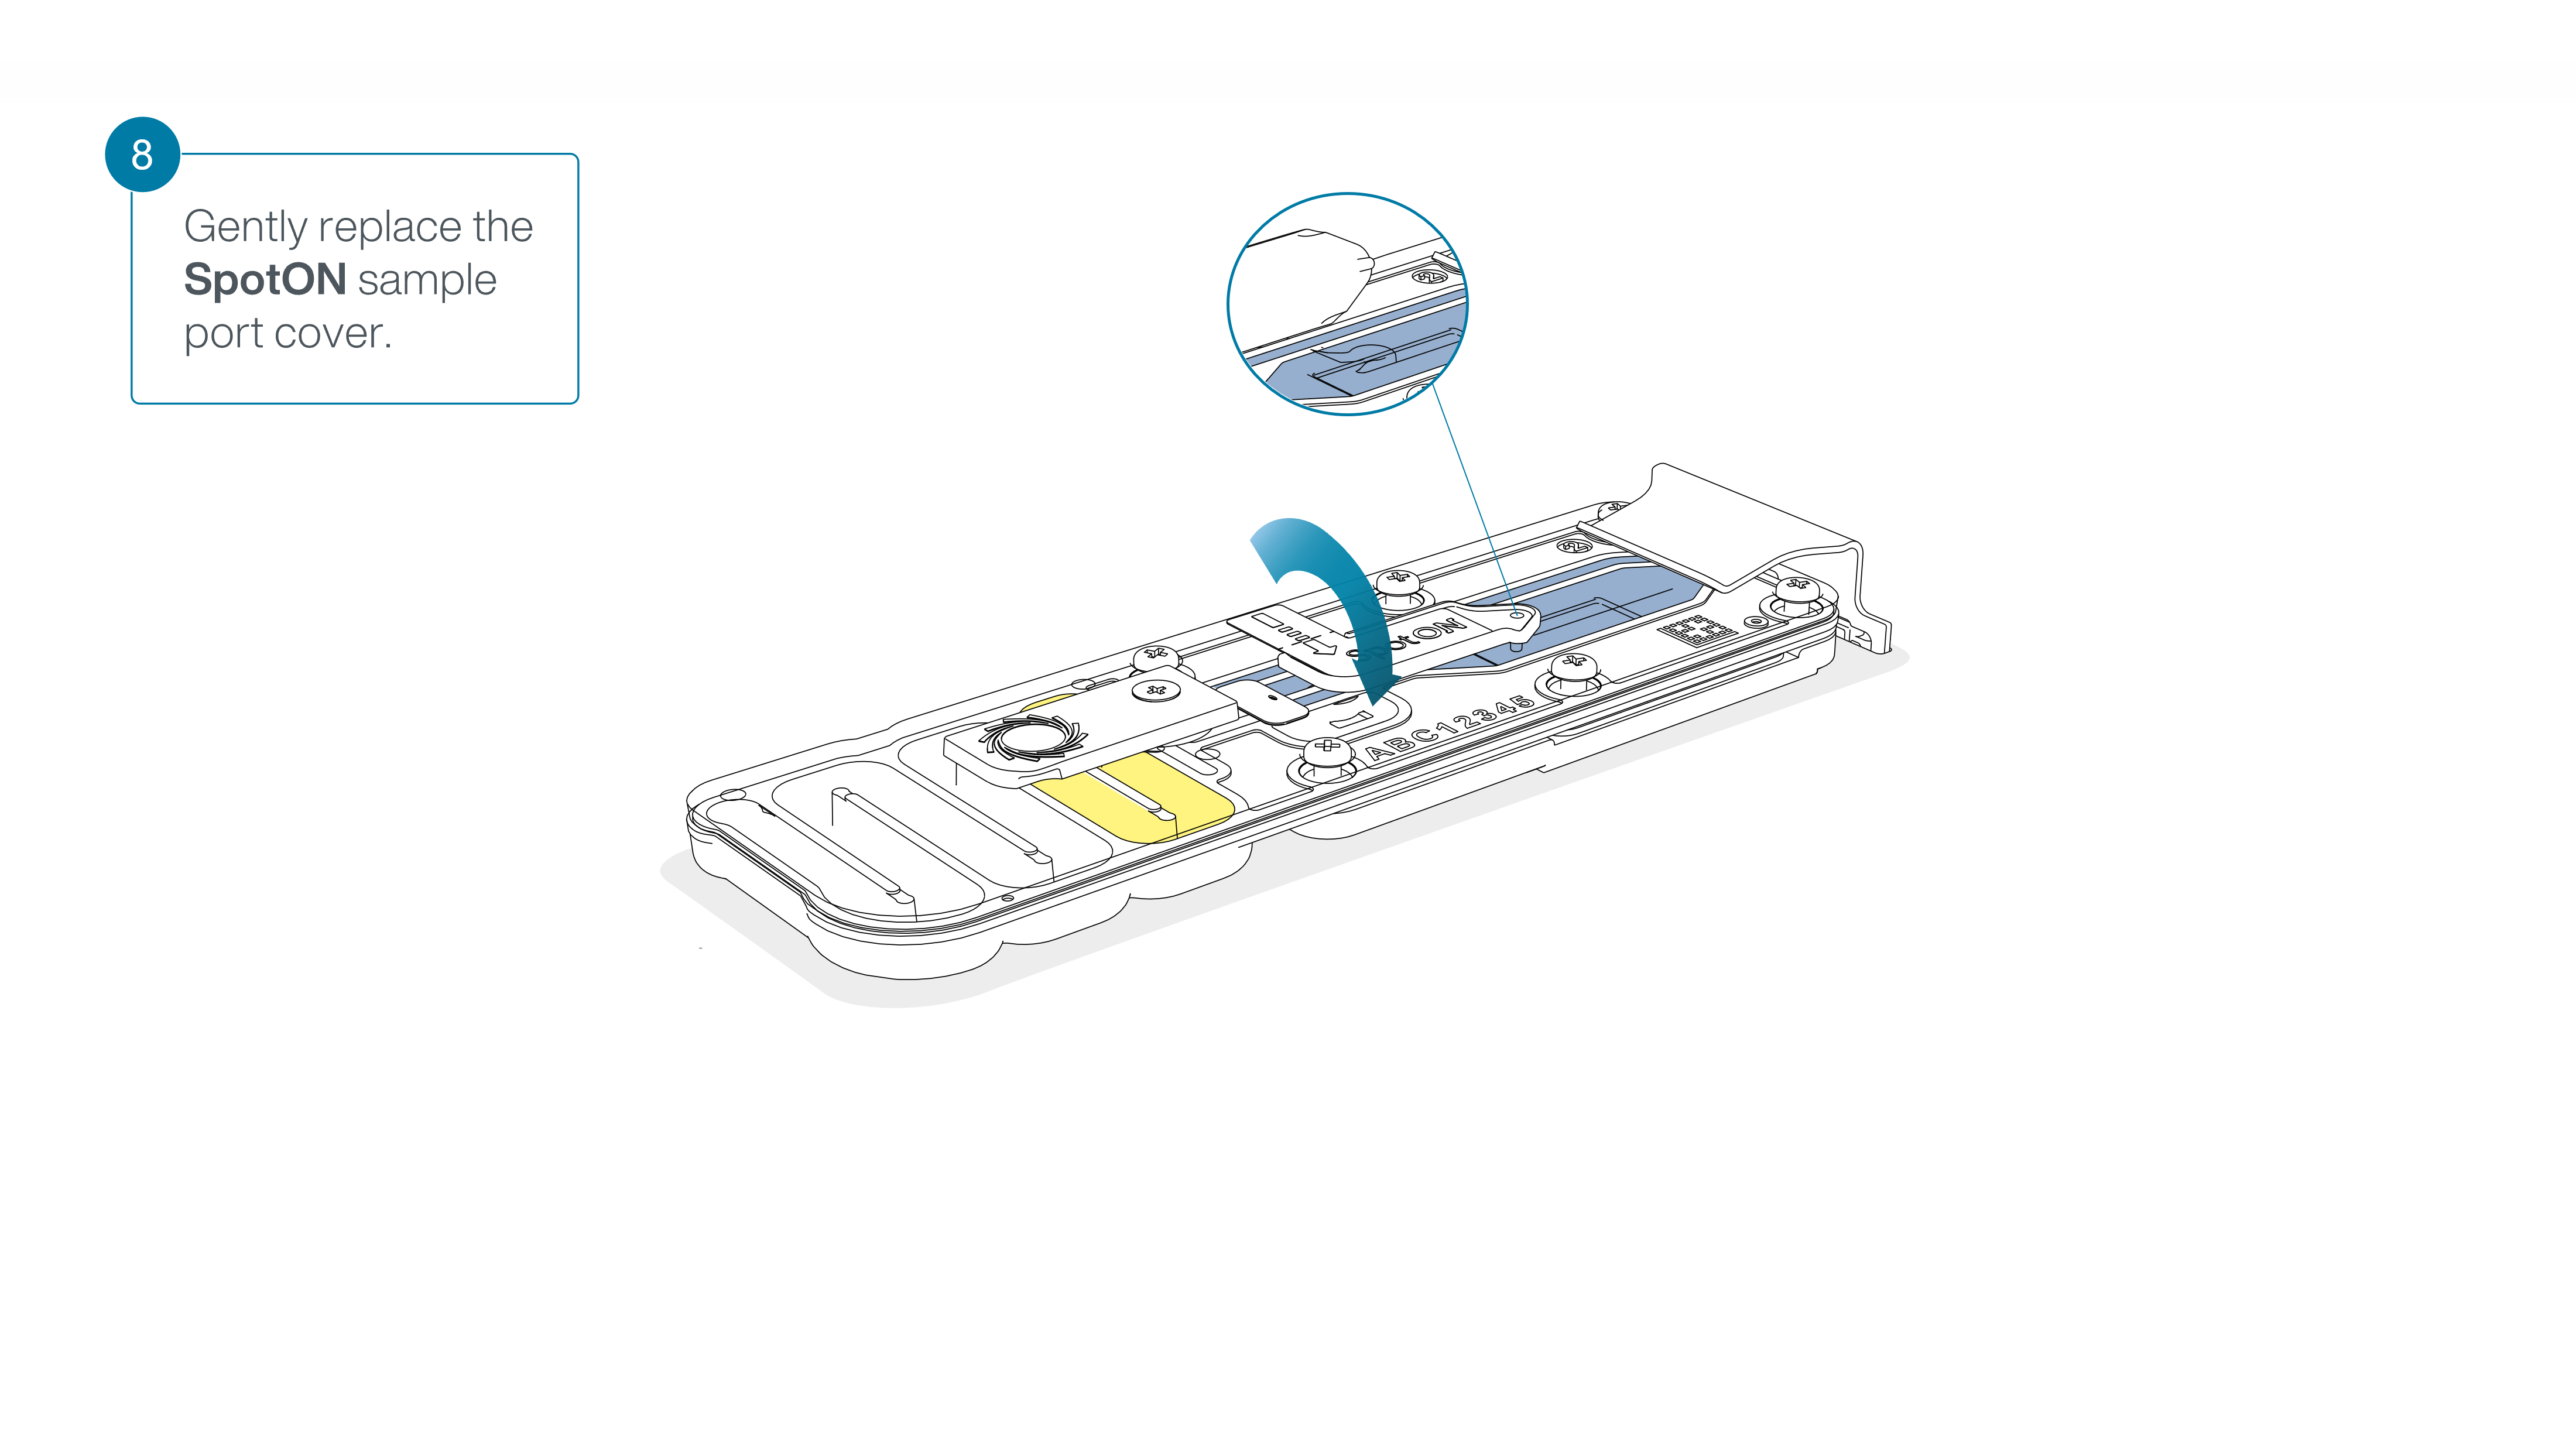
Gently replace the SpotON sample port cover, making sure the bung enters the SpotON port and close the priming port.
-
Place the light shield onto the flow cell, as follows:
Carefully place the leading edge of the light shield against the clip.
Note: Do not force the light shield underneath the clip.Gently lower the light shield onto the flow cell. The light shield should sit around the SpotON cover, covering the entire top section of the flow cell.