- Materials
-
- Input RNA in 10 mM Tris-HCl, pH 8.0
- Midnight Primer Pool A (MP A)
- Midnight Primer Pool B (MP B)
- Consumables
-
- Arvensis B-Frame BIOCOMPOSITE 96 Well PCR Plate Fully Skirted Low Profile 0.2 ml wells
- PCR plate seals
- Nuclease-free water (e.g. ThermoFisher, cat # AM9937)
- LunaScript RT SuperMix (LS RT)
- Q5 HS Master Mix (Q5)
- 1.5 ml Eppendorf DNA LoBind tubes
- Equipment
-
- Ice bucket with ice
- PCR hood with UV steriliser (optional but recommended to reduce cross-contamination)
- Opentrons OT-2 robot
- Opentrons P20 8-Channel Pipette (GEN2) and tips
- Opentrons Thermocycler Module
- P1000 pipette and tips
- P200 pipette and tips
- P20 pipette and tips
- P10 pipette and tips
- P2 pipette and tips
- Microfuge
- Centrifuge capable of taking 96-well plates
-
Optional actionWhen running the pre-PCR Midnight Opentrons protocol for the first time, it is recommended to prepare and carry out the run using water replacements for the reagents and samples.
This will prepare the user for protocol loading and calibration in a non-time sensitive environment.
-
Reagent quantities:
Reagent X96 samples X48 samples X24 samples Nuclease-free water 928 µl 464 µl 232 µl LunaScript RT SuperMix 280 µl 140 µl 70 µl Q5 Hot Start Master Mix 1566.4 µl 783.2 µl 391.6 µl Midnight Primer Pool A 6.9 µl 3.5 µl 1.8 µl Midnight Primer Pool B 6.9 µl 3.5 µl 1.8 µl -
Opentrons hardware and software setup:
-
Download and install the Opentrons App for OT-2 robot from Opentrons official website on your PC.
Follow the link to the get the Opentrons App.
-
Attach P20 8-channel GEN2 pipette to the left Opentrons pipette mount following the vendor’s instruction.
Follow the link to the manufacturers instuctions on Getting started: Attaching Opentrons Pipettes.
-
Place the thermocycler module across deck positions 7, 8, 10 and 11; and connect to the power socket and the Opentrons robot following the vendor's instructions.
Follow the link to the manufacturers instuctions for the Opentrons Thermocycler manual.
-
Connect the Opentrons USB port to the PC you will be using.
Follow the link to the manufacturers instuctions for the Get started: connect to your OT-2 over USB.
-
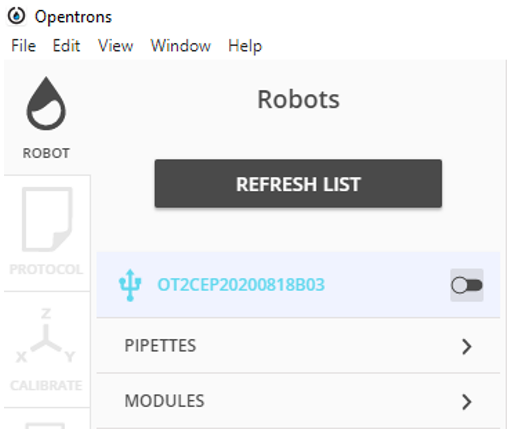
Connect the Opentrons to the software by pressing 'TRY AGAIN' or 'REFRESH LIST' and pressing on the name of the Opentrons you are using.
-
Run setup:
For reference, the vendors instructions for file loading and start-up are available following the link to Get started: Run your protocol.
-
Turn on the Opentrons and the thermocycler module.
-
Make sure the thermocycler module is connected to the Opentrons and the Opentrons is connected to the PC.
-
Place the Rubber PCR Seal on the thermocycler lid and clean it with ethanol.
Note: Rubber seal does not need to be replaced each use. Opentrons suggest changing the rubber seal every 20 uses.
If reusing the rubber seal, ensure it is cleaned with ethanol between each use. -
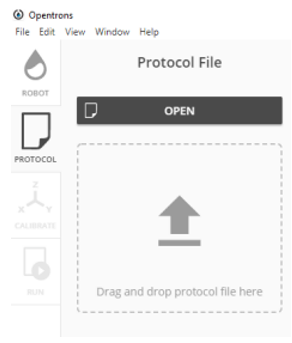
Load the scripts to match the sample count and labware used by dragging and dropping the script file or using the path for the script file.
-
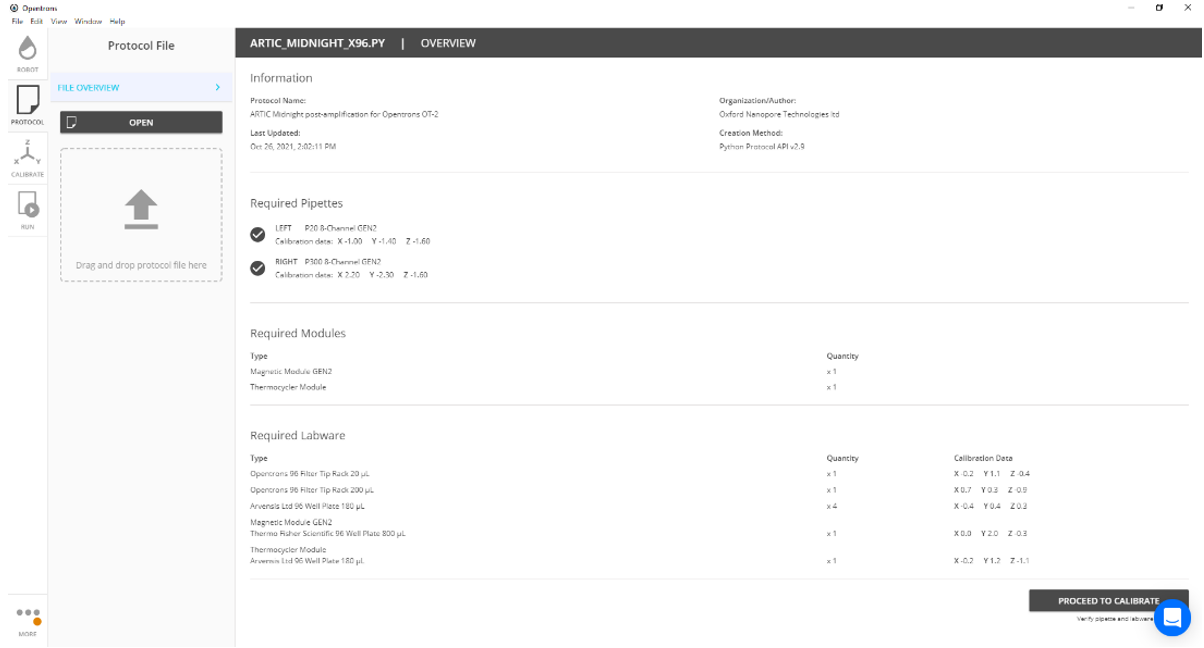
Select 'Proceed to calibration'.
-
Open the 'CALIBRATION' window and ensure all the required modules are connected and in the correct deck positions as they appear on the screen. Then select 'CONTINUE TO LABWARE SETUP'.
-
Reagent and labware setup:
-
Thaw and keep the samples, LunaScript RT SuperMix, the Q5 Hot Start Master Mix and the primers on ice.
-
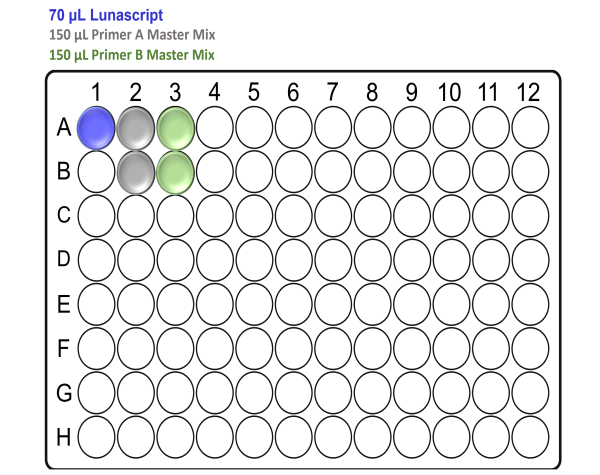
In the template-free pre-PCR hood, prepare the following Primer master mixes in 1.5 ml Eppendorf DNA LoBind tubes and mix thoroughly as follows:
For x24 samples:
Reagent Pool A Pool B Nuclease-free water 116 µl 116 µl Midnight Primer Pool A (MP A) 1.8 µl - Midnight Primer Pool B (MP B) - 1.8 µl Q5 HS Master Mix (Q5) 195.8 µl 195.8 µl Total 313.6 µl 313.6 µl For x48 samples:
Reagent Pool A Pool B Nuclease-free water 232 µl 232 µl Midnight Primer Pool A (MP A) 3.5 µl - Midnight Primer Pool B (MP B) - 3.5 µl Q5 HS Master Mix (Q5) 391.6 µl 391.6 µl Total 627.1 µl 627.1 µl For x96 samples:
Reagent Pool A Pool B Nuclease-free water 464 µl 464 µl Midnight Primer Pool A (MP A) 6.9 µl - Midnight Primer Pool B (MP B) - 6.9 µl Q5 HS Master Mix (Q5) 783.2 µl 783.2 µl Total 1,254.1 µl 1,254.1 µl Note: Taking care not to introduce air bubbles, pipette mix 10-15 times between each addition and perform a final full-volume pipette mix 10 times.
Keep on ice until use.
-
In the template-free pre-PCR hood and using a clean Arvensis plate, prepare the reagent input plate as follows:
For x24 samples:
For x48 samples:
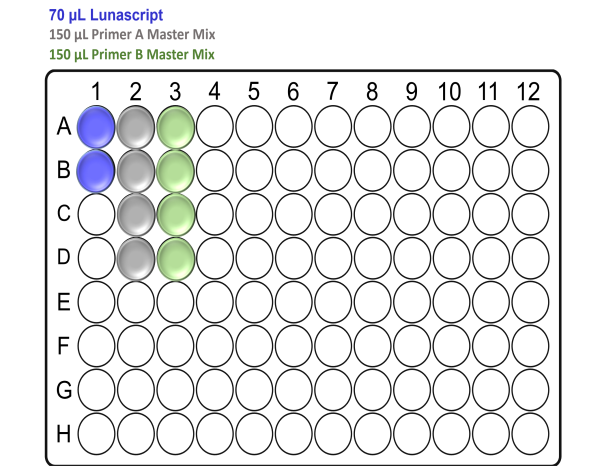
For x96 samples:

Note: Take care to not introduce air bubbles while aliquoting the reagents into the Arvensis plate.
Once complete seal the plate and keep on ice until ready to transfer over to the Opentrons robot.
-
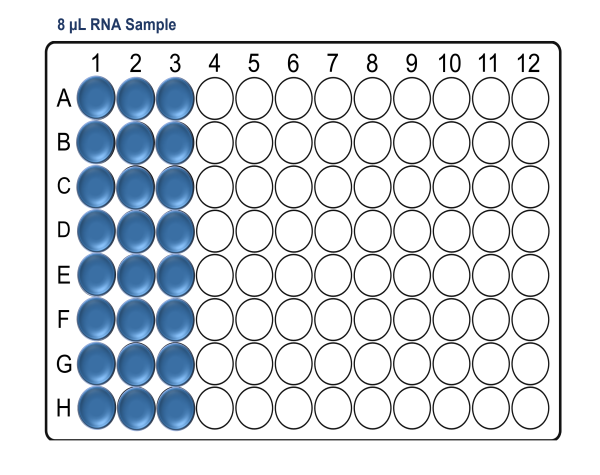
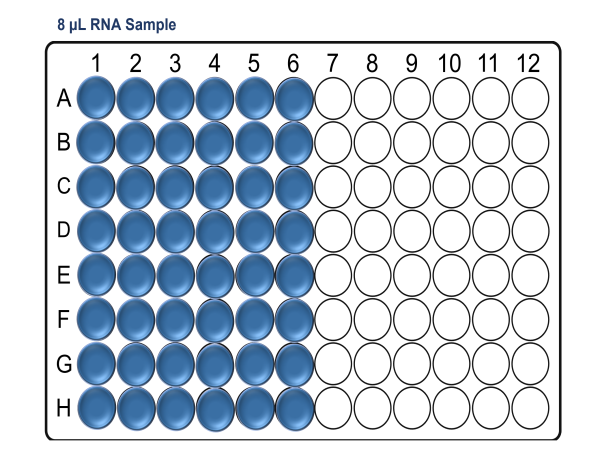
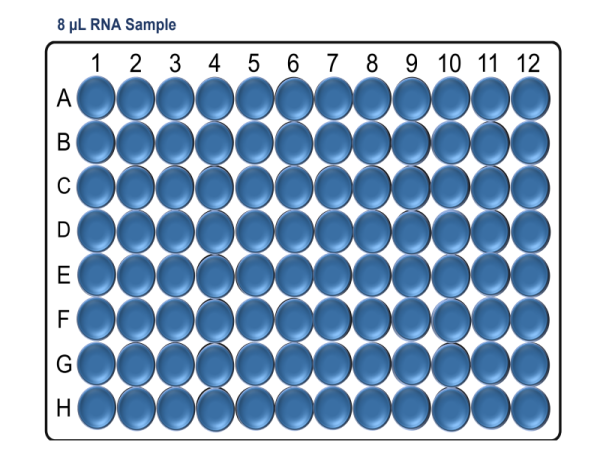
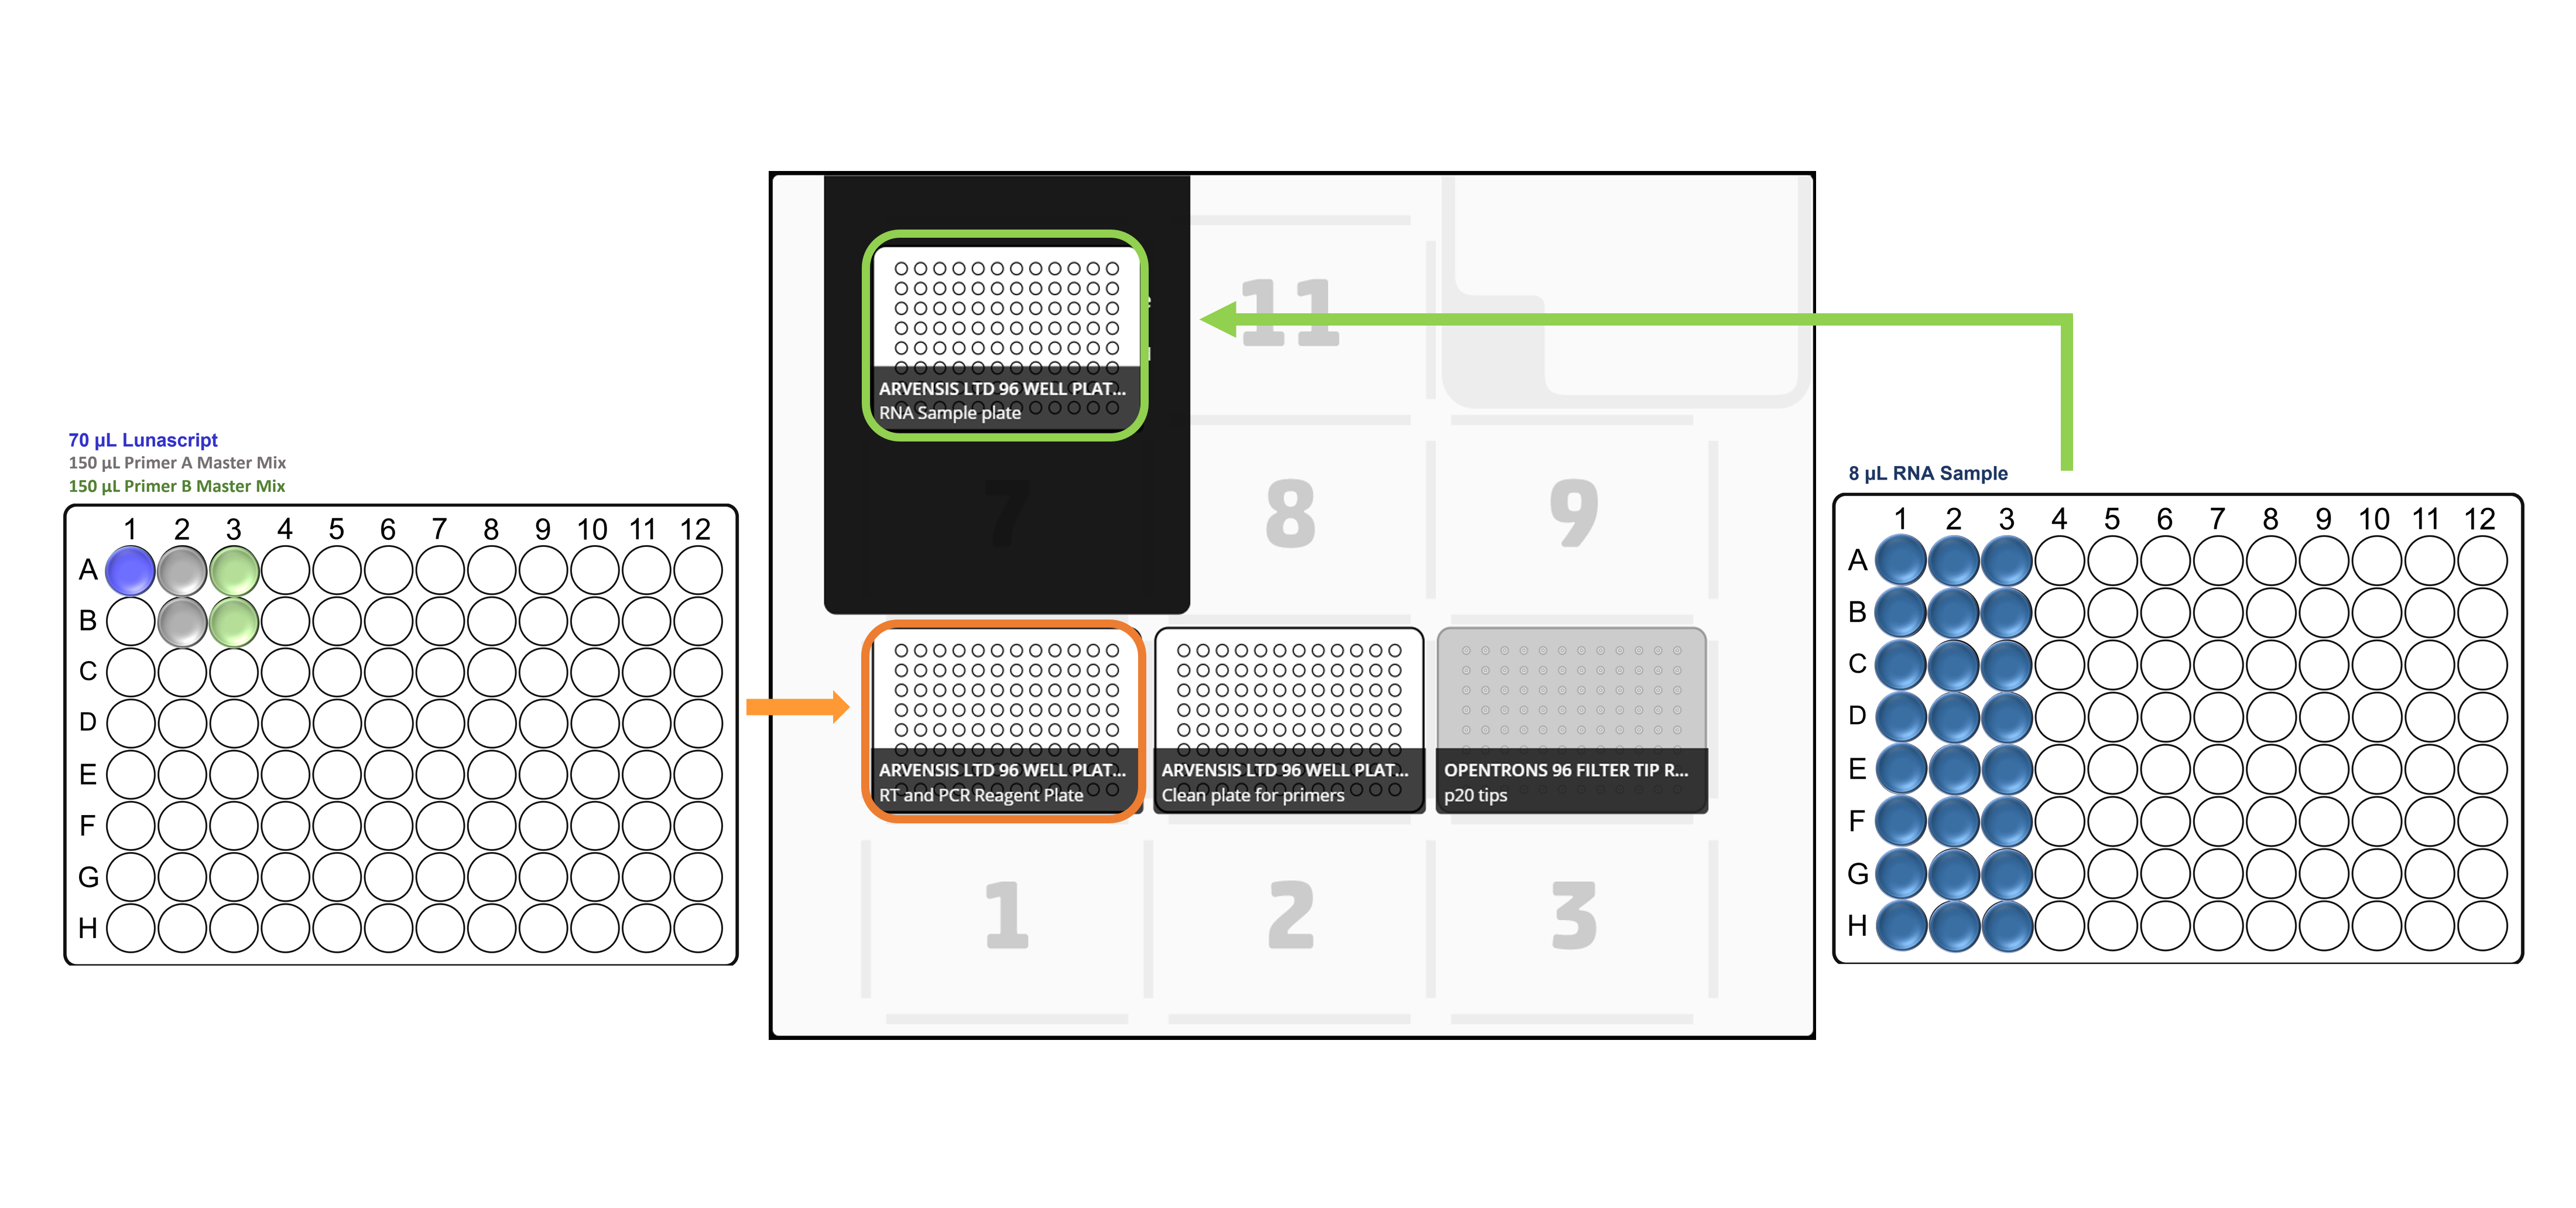
In the pre-PCR hood and using a clean Arvensis plate, prepare the RNA sample input plate as follows:
For x24 samples:
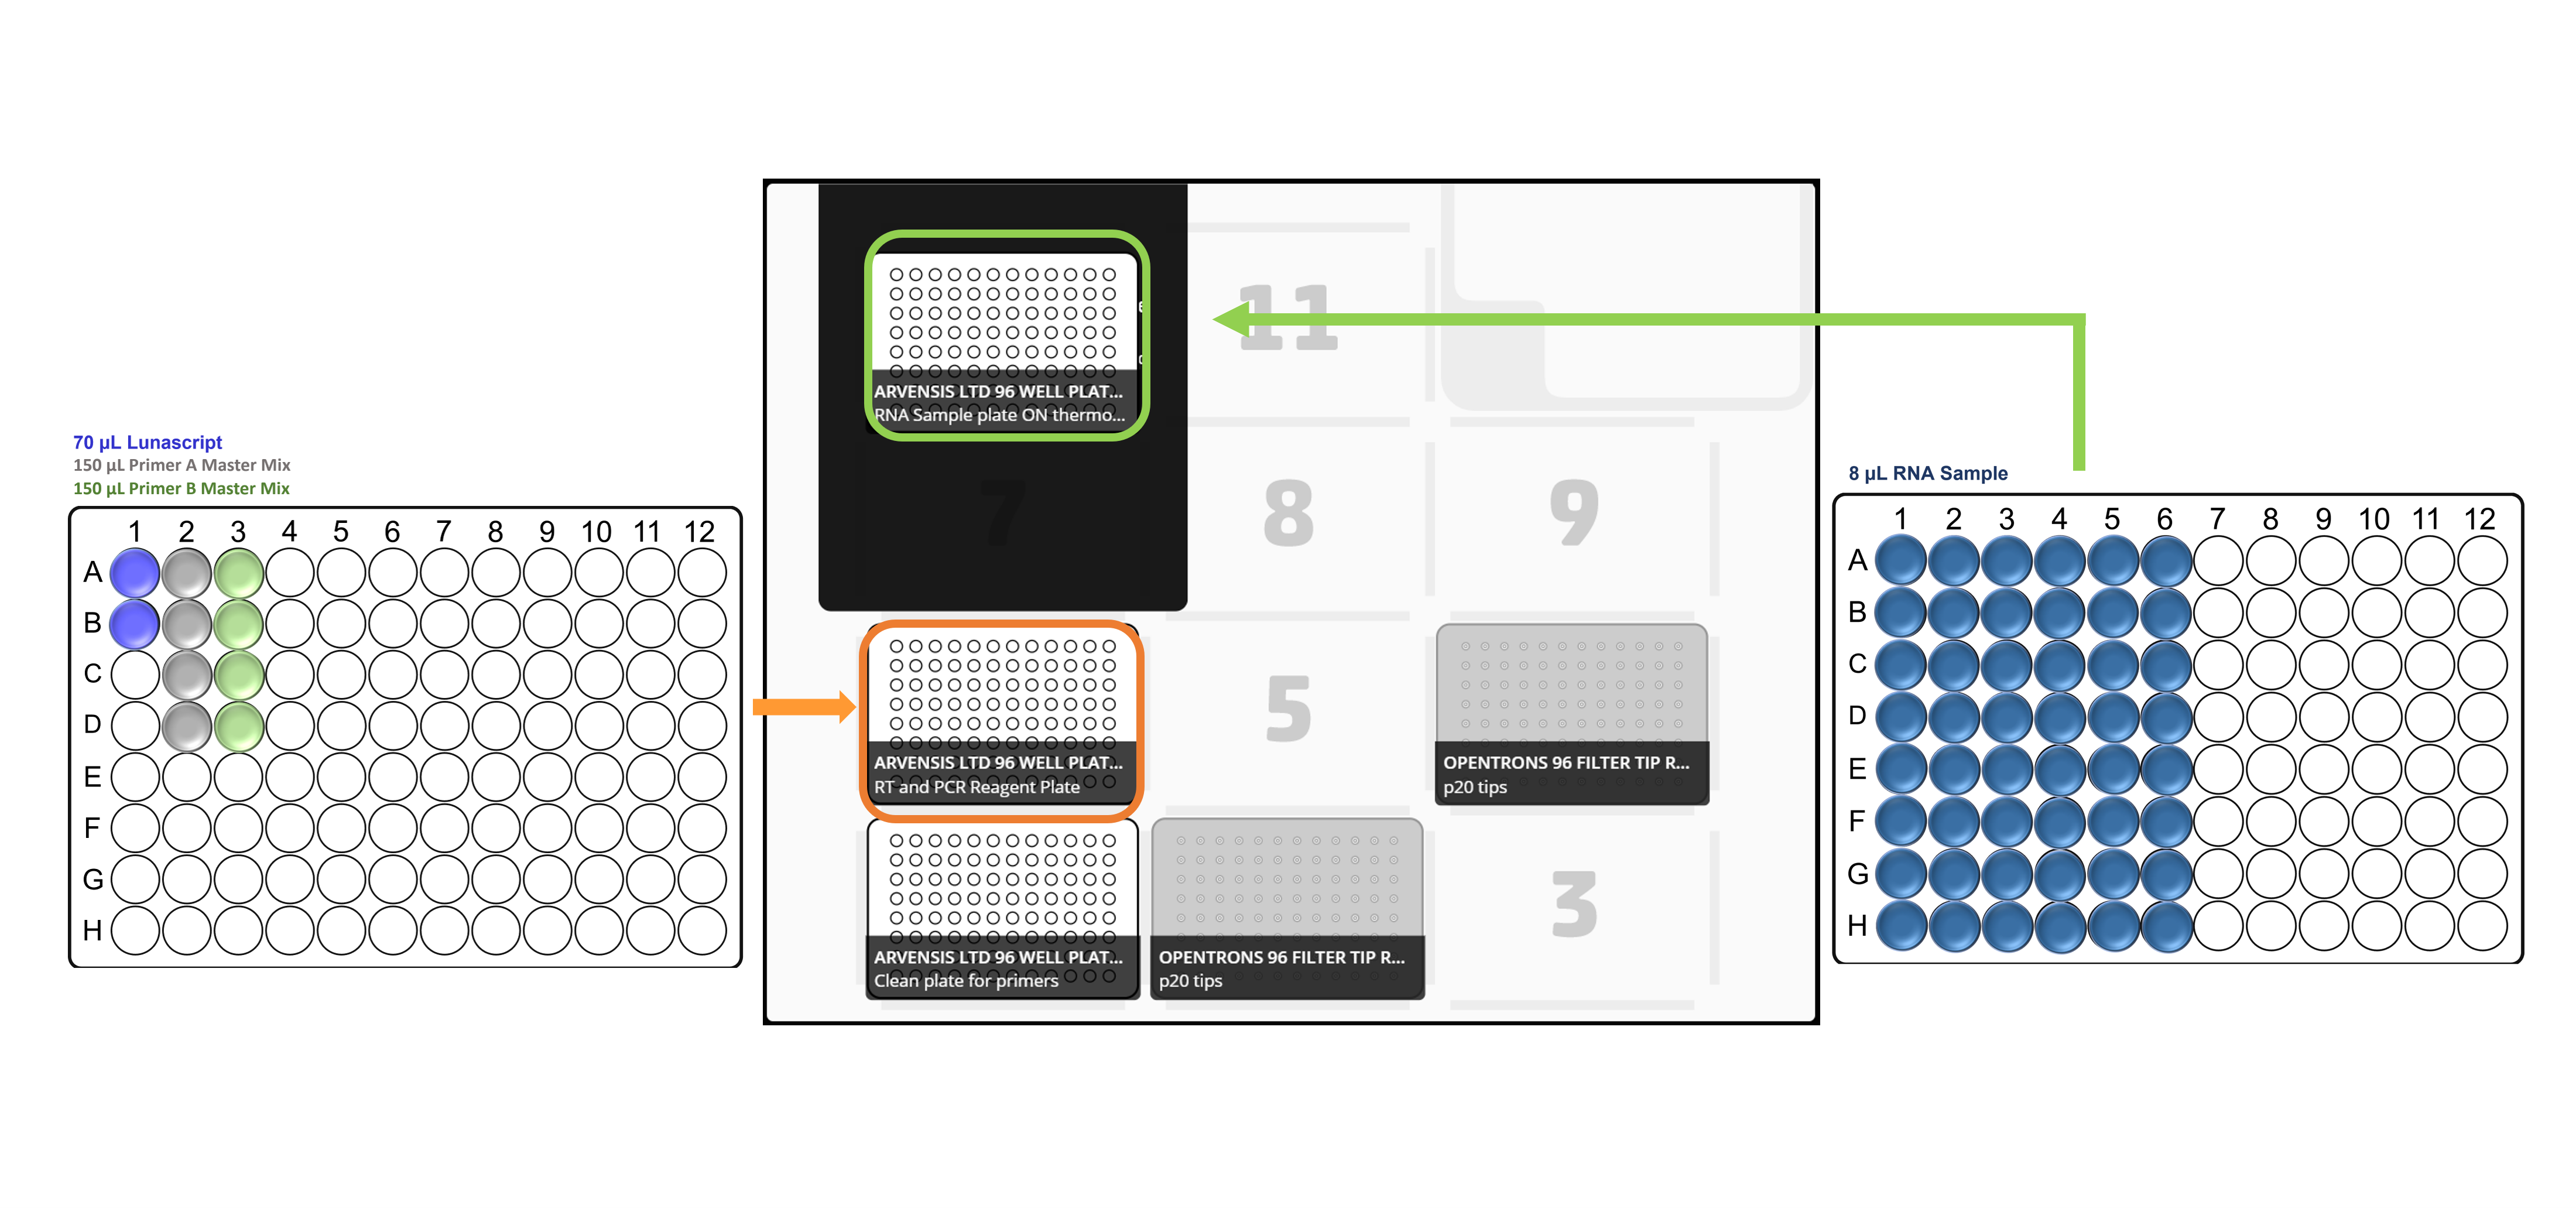
For x48 samples:
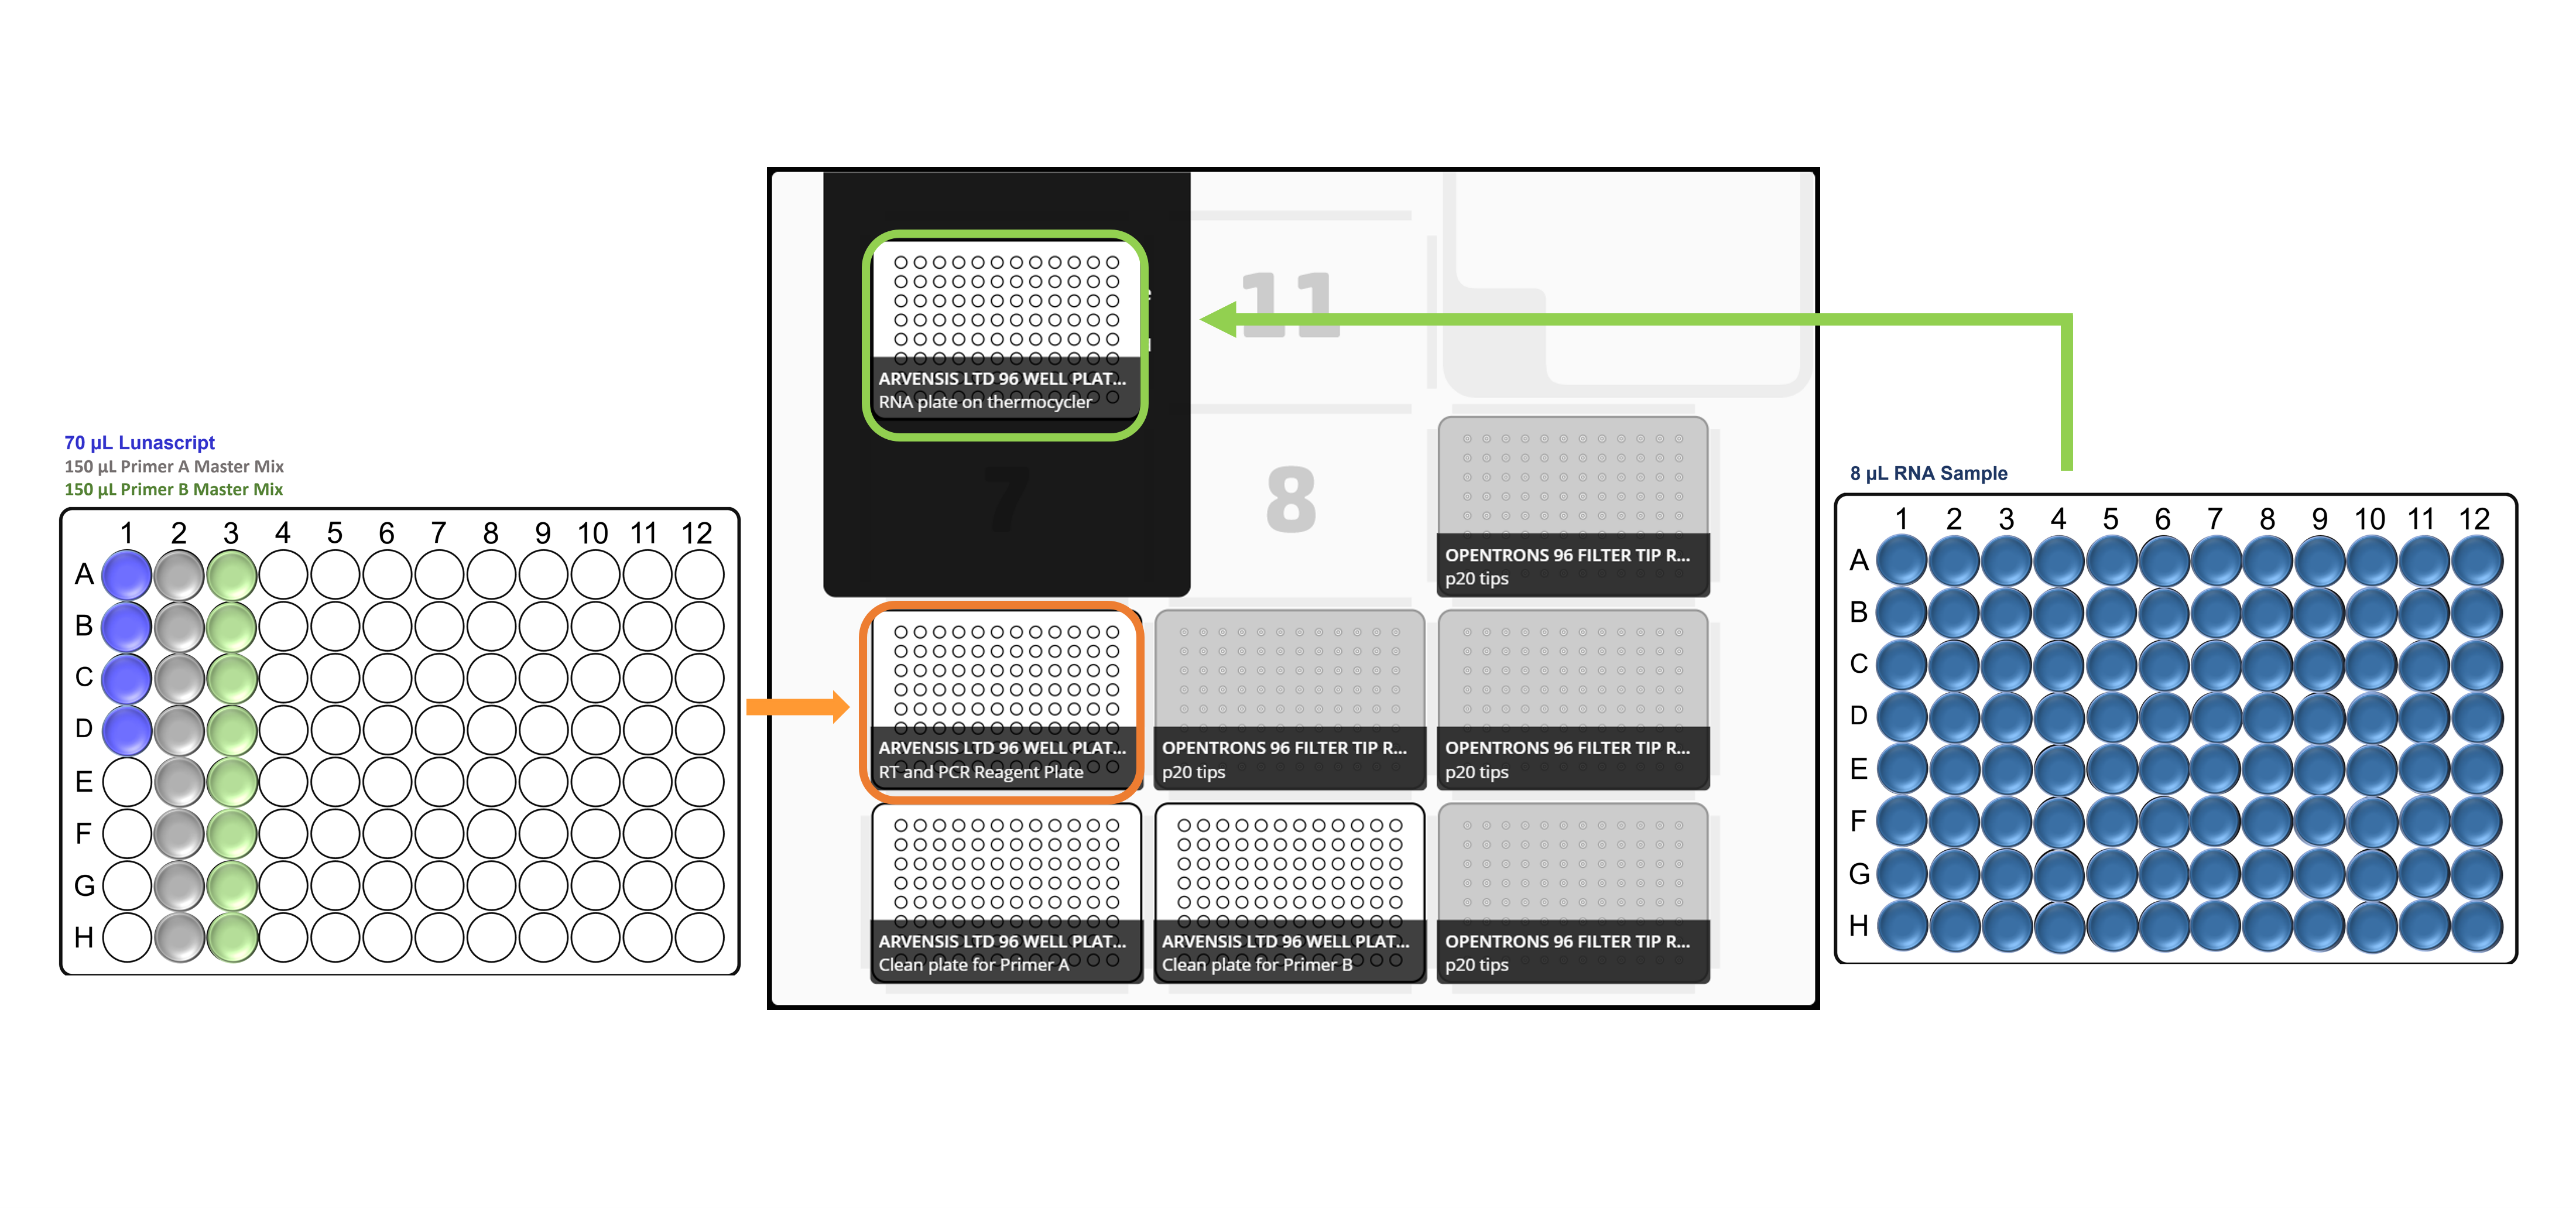
For x96 samples:
Note: Take care to not introduce air bubbles while aliquoting the samples into the Arvensis plate.
Once complete seal the plate and keep on ice until ready to transfer over to the Opentrons robot.
-
Opentrons loading and starting run:
-
Place the all the labware, reagent and sample plates in the Opentrons deck in accordance with the deck layouts:
For x24 samples:
For x48 samples:
For x96 samples:
Important: Ensure you remove all labware lids and plate seals once on deck.
Collision between the pipette head and obstructions such as tip box lids can cause damage to the pipette head or offset the head from its calibrated position.
Following any collision the pipette head must be fully recalibrated. -
Start the calibration process by selecting 'CONTINUE MOVING TO TIPRACK' and following the on-screen instructions:
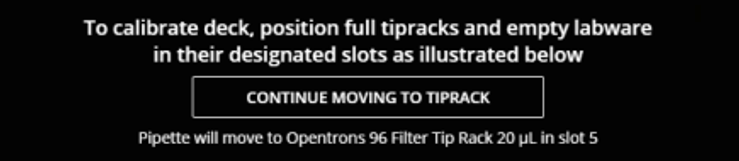
-
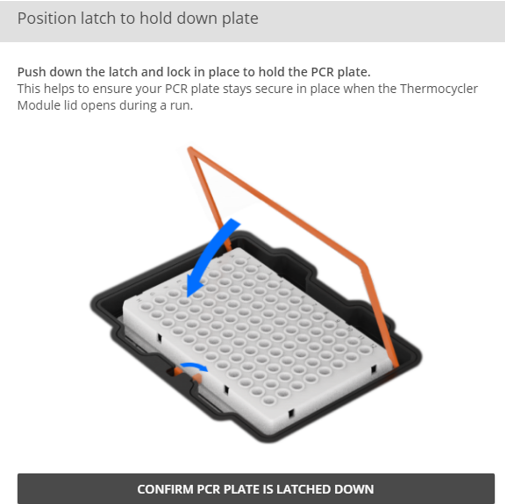
Ensure the empty PCR plate is latched down on the thermocycler module.
-
Follow the on-screen prompts and calibrate your equipment in accordance to manufacturers instructions.
-
Select 'START RUN' to begin your run.
-
Once the run is complete, remove the PCR plate (or plates if processing X96 samples) from the Opentrons deck, seal it and spin it down.
-
Place in the thermal cycler and incubate using the following program, with the heated lid set to 105°C:
Step Temperature Time Cycles Initial denaturation 98°C 30 sec 1 Denaturation
Annealing and extension98°C
61°C
65°C15 sec
2 min
3 min
35Hold 4°C ∞


